
Hi, I’m Shunsuke Nakamura (@sunsuk7tp). Just half a year ago, I completed the Computer Science Master’s program in Tokyo Tech and joined to NHN Japan as a member of LINE server team. My ambition is to hack distributed processing and storage systems and develop the next generation’s architecture.
In the LINE server team, I’m in charge of development and operation of the advanced storage system which manages LINE’s message, contacts and groups.
Today, I’ll briefly introduce the LINE storage stack.
LINE Beginning with Redis [2011.6 ~]
In the beginning, we adopted Redis for LINE’s primary storage. LINE is targeted for an instant messenger quickly exchanging messages, and the scale had been assumed to at most total 1 million registered users within 2011. Redis is an in-memory data store and does its intended job well. Redis also enables us to take snapshots periodically on disk and supports sync/asynchronous master-slave replication. We decided that Redis was the best choice despite the scalability and availability issues caused by the in-memory data store. The entire LINE storage system started with just a single Redis cluster constructed from 3 nodes sharded on client-side.
The larger the scale of the service, the more nodes were needed, and client-side sharding prevented us from scaling effectively. The original Redis still doesn’t support server-side sharding. So far, we have achieved a sharded redis cluster to utilize our developed clustering manager. Our sharded redis cluster is coordinated by the cluster manager daemons and ZooKeeper quorum servers.
This manager has the following characteristics:
- Sharding management by ZooKeeper (Consistent hashing, compatible with other algorithms)
- Failure detection and auto/manual failover between master and slave
- Scales out with minimal downtime (< 10 sec)
Currently, several sharded Redis clusters are running with hundreds of servers.

Tolerance Unpredictable Scaling [2011.10 ~]
However, the situation has changed greatly since then. Around October 2011, LINE experienced tremendous growth in many parts of the world, and operating costs increased as well.
A major issue of increased costs is to scale Redis Cluster in terms of capability. It’s much more difficult to operate Redis cluster to tolerance the unpredictable scale expansion because it needs more servers than the other persistent storages for the nature of in-memory data store. In order to take advantage of safely availability functionalities such as snapshot and full replication, it is necessary to adequately care of memory usage. Redis VM (Virtual Memory) is to somewhat helpful but can significantly impair performance depending on VM usage.
For the above reasons, we often misjudged the timing to scale out and encountered some outages. It then became critical to migrate to a more highly scalable system with high availability.
Over night, the target of LINE has been changed to scale 10s to 100s of millions of registered users.

This is how we tackled the problem.
Data Scalability
At first, we analyzed the order of magnitude for each database.
(n: # of Users)
(t: Lifetime of LINE System)
- O(1)
- Messages in delivery queue
- Asynchronous jobs in job queue
- O(n)
- User Profile
- Contacts / Groups
- These data originally increase with O(n^2), but there are limitations on the number of links between users. (= O (n * CONSTANT_SIZE))
- O(n*t)
- Messages in Inbox
- Change-sets of User Profile / Groups / Contacts
Rows stored in LINE storage have increased exponentially. In the near future, we will deal with tens of billions of rows per month.

Data Requirement
Second, we summarized our data requirements for each usage scenario.
- O(1)
- Availability
- Workload: very fast reads and writes
- O(n)
- Availability, Scalability
- Workload: fast random reads
- O(n*t)
- Scalability, Massive volume (Billions of small rows per day, but mostly cold data)
- Workload: fast sequential writes (append-only) and fast reads of the latest data
Choosing Storage
Finally, according to the above requirements for each storage, we chose the suitable storage. As one of the criteria to configure each storage properties and determine which storage is most suitable for LINE app workloads, we benchmarked several candidates using tools such as YCSB (Yahoo! Cloud Serving Benchmark) and our own original benchmark to simulate their workloads. As a result, we decided to use HBase as the primary storage method for storing data with the exponential growth patterns such as message timeline. The characteristics of HBase are suitable for message timeline, whose workload is the latest workload, where the most recently inserted records are in the head of the distribution.
- O(1)
- Redis is the best choice.
- O(n), O(n*t)
- There are several candidates.
- HBase
- pros:
- Best matches our requirements
- Easy to operate (Storage system built on DFS, multiple ad hoc partitions per server)
- cons:
- Random read and deletion are somewhat slow.
- Slightly lower avaiability (there're some SPOF)
- Cassandra (
My favorite NoSQL) - pros:
- Also suitable for dealing with the latest workload
- High Availability (decentralized architecture, rack/DC-aware replication)
- cons:
- High operation costs due to weak consistency
- Counter increments are expected to be slightly slower.
- MongoDB
- pros:
- Auto sharding, auto failover
- A rich range of operations (but LINE storage doesn't require most of them.)
- cons:
- NOT suitable for the timeline workload (B-tree indexing)
- Ineffective disk and network utilization
In summary, LINE storage layer is currently constructed as the follows:
- Standalone Redis: asynchronous job and message queuing
- Redis queue and queue dispatcher are running together on each application server.
- Sharded Redis: front-end cache for data with O(n*t) and primary storage with O(n)
- Backup MySQL: secondary storage (for backup, statistics)
- HBase: primary storage for data with O(n*t)
- We assume to operate hundreds of terabytes of data on each cluster with 100s to 1000 servers.
LINE main storage is constructed from about 600 nodes and continues to increase month after month.

Data Migration from Redis to HBase
We gradually migrated tens of terabytes worth of data sets from Redis cluster to HBase cluster. Specifically, we migrated in three phases:
- Bi-directional write to Redis and HBase and read only from Redis
- Run migrating script on backend (Sequentially retrieve data from Redis and write to HBase)
- Write to both Redis (w/ TTL) and HBase (w/o TTL) and bi-directional read from both (Redis alternatives to a cache server.)
Something to make note of is that one should avoid overwriting recent data with the older data; the migrated data are most append-only and the consistency of the other data are kept using timestamp of HBase column.
HBase and HDFS
A number of HBase clusters have been running stably for the most part on HDFS. We constructed a HBase cluster for each database (e.g., messages, contacts) and each cluster is tuned according to the workload of each database. They share a single HDFS cluster consisting of 100 servers, where each server has 32GB of memory and 1.5TB of hard disk space. Each RegionServer has 50 small regions less than a single 10GB one. Read performance for Bigtable-like architecture is impacted by (major) compaction, so each region's size should be kept not too large size to prevent continuous major compaction, especially during peak hours. During off-peak hours, large regions are automatically split into smaller regions by a periodic cron job, while operators manually perform load balancing. Of course, HBase has auto splitting and load balancing functionalities, but we consider it best to set up manually in view of service requirements.
Thus the growth of the service, scalability is one of the important issues. We plan to place at most hundreds of servers per cluster. Each message has TTL and it is partitioned to multi-cluster in units of TTL. By doing so, the old cluster, where all of messages have expired, is full-truncated and enables to be reused as a new cluster.
Current and future challenges [2012]
Since migrating to HBase, LINE storage has been operating more stably. Each HBase cluster is current processing several times as requests as during New Year peak time. Even still, there are sometimes failures due to storage. We are left with the following availability issues for HBase and Redis cluster.
- A redundant configuration and failover feature that does not include a single point of failure for each component including rack/DC-awareness
- We examine replication in various layers such as full replication and SSTable or block level replication between HDFS clusters.
- Compensation for the failures between clusters (Redis cluster, HBase, and multi-HBase cluster)
HA-NameNode
As you may already know, the NameNode is a single point of failure for HDFS. Though the NameNode process itself rarely fails (Notes: Experience at Yahoo!), other software failures or hardware failures such as disk and network failures are bound to occur. A NameNode failover procedure is thus required in order to achieve high availability.
There are the several HA-NameNode configurations:
- High Availability Framework for HDFS NameNode (HDFS-1623)
- Backup NameNode (0.21)
- Avatar NameNode (Facebook)
- HA NameNode using Linux HA
- Active/passive configuration deploying two NameNode (cloudera)
We configure HA-NameNode using Linux HA. Each component of Linux-HA has a role similar to the following:
- DRBD: Disk mirroring
- Heartbeat / (Corosync): Network fail-detector
- Pacemaker: Failover definition
- service: NameNode, Secondary NameNode, VIP
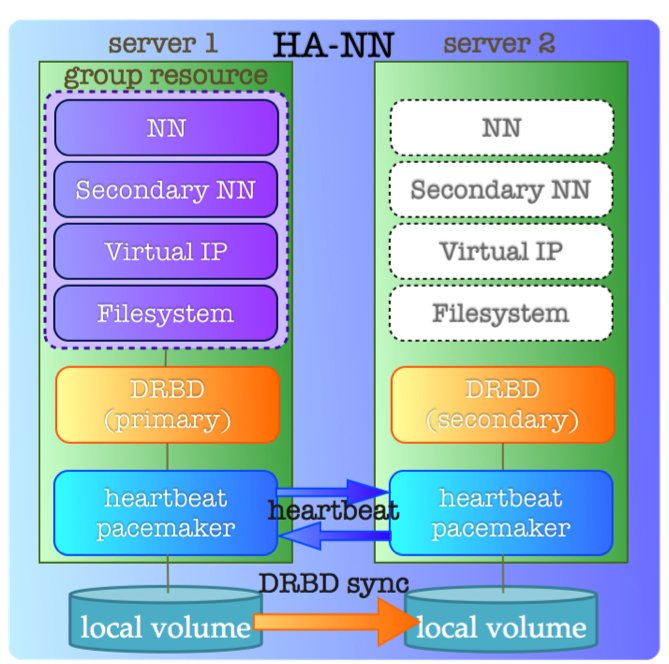
DRBD (Distributed Replicated Block Device) provides block level replication; essentially it's network-enabled RAID driver. Heartbeat monitors the status of the network between the other server. If Heartbeat detects hardware or service outages, it switches primary/secondary in DRBD and kicks each service's daemon based on logic defined by pacemaker.
Conclusion
Thus far, we've faced various challenges for scalability and availability with the growth of LINE. However, LINE storage and strategies will be much more immature, given extreme scaling and the various failure cases. We would like to grow ourselves with the future growth of LINE.
Appendix: How to setup HA-NameNode using Linux-HA
In the rest of this entry, I will introduce how to build HA-NameNode using two CentOS 5.4 servers and Linux-HA. These servers are to assume the following environment.
- Hosts:
- NAMENODE01: 192.168.32.1 (bonding)
- NAMENODE02: 192.168.32.2 (bonding)
- OS: CentOS 5.4
- DRBD (v8.0.16):
- conf file: ${DEPLOY_HOME}/ha/drbd.conf
- resource name: drbd01
- mount disk: /dev/sda3
- mount device: /dev/drbd0
- mount directory: /data/namenode
- Heartbeat (v3.0.3):
- conf file: ${DEPLOY_HOME}/ha/haresources, authkeys
- Pacemaker (v1.0.12)
- service daemons
- VIP: 192.168.32.3
- Hadoop NameNode, SecondaryNameNode (v1.0.2, the latest edition now)
Configuration
Configure drbd and heartbeat settings in your deploy home direcoty, ${DEPLOY_HOME}.
- drbd.conf
global { usage-count no; }

resource drbd01 {
  protocol  C;
  syncer { rate 100M; }
  startup { wfc-timeout 0; degr-wfc-timeout 120; }

  on NAMENODE01 {
    device /dev/drbd0;
    disk    /dev/sda3;
    address 192.168.32.1:7791;
    meta-disk   internal;
  }
  on NAMENODE02 {
    device /dev/drbd0;
    disk    /dev/sda3;
    address 192.168.32.2:7791;
    meta-disk   internal;
  }
}
- ha.conf
debugfile ${HOME}/logs/ha/ha-debug
logfile ${HOME}/logs/ha/ha-log
logfacility local0
pacemaker on
keepalive 1
deadtime 5
initdead 60
udpport 694
auto_failback off
node  NAMENODE01 NAMENODE02
haresources(Can skip this step when using pacemaker)
# <primary hostname> <vip> <drbd> <local fs path> <running daemon name>
NAMENODE01 IPaddr::192.168.32.3 drbddisk::drbd0 Filesystem::/dev/drbd0::/data/namenode::ext3::defaults hadoop-1.0.2-namenode
{code}
- authkeys
auth 1
1 sha1 hadoop-namenode-cluster
Installation of Linux-HA
Pacemaker and Heartbeat3.0 packages are not included in the default base and updates repositories in CetOS5. Before installation, you first need to add the Cluster Labs repo:
wget -O /etc/yum.repos.d/clusterlabs.repo http://clusterlabs.org/rpm/epel-5/clusterlabs.repo
Then run the following script:
yum install -y drbd kmod-drbd heartbeat pacemaker

# logs
mkdir -p ${HOME}/logs/ha
mkdir -p ${HOME}/data/pids/hadoop

# drbd
cd ${DRBD_HOME}
ln -sf ${DEPLOY_HOME}/drbd/drbd.conf drbd.conf
echo "/dev/drbd0 /data/namenode ext3 defaults,noauto 0 0" >> /etc/fstab
yes | drbdadm create-md drbd01

# heartbeat
cd ${HA_HOME}
ln -sf ${DEPLOY_HOME}/ha/ha.cf ha.cf
ln -sf ${DEPLOY_HOME}/ha/haresources haresources
cp ${DEPLOY_HOME}/ha/authkeys authkeys
chmod 600 authkeys

chown -R www.www ${HOME}/logs
chown -R www.www ${HOME}/data
chown -R www.www /data/namenode

chkconfig -add heartbeat
chkconfig hearbeat on
DRBD Initialization and Running heartbeat
- Run drbd service @ primary and secondary
# service drbd start
- Initialize drbd and format NameNode@primary
# drbdadm -- --overwrite-data-of-peer primary drbd01
# mkfs.ext3 /dev/drbd0
# mount /dev/drbd0
$ hadoop namenode -format
# umount /dev/drbd0
# service drbd stop
- Run heartbeat @ primary and secondary
# service heartbeat start
Daemonize hadoop processes (Apache Hadoop)
When using Apache Hadoop, you need to daemonize each node such as NameNode, SecondaryNameNode in order for heartbeat process to kick them. The follow script, "hadoop-1.0.2-namenode" is an example for NameNode daemon.
- /usr/lib/ocf/resource.d/nhnjp/hadoop-1.0.2-namenode
#!/bin/sh
BASENAME=$(basename $0)
HADOOP_RELEASE=$(echo $BASENAME | awk '{n = split($0, a, "-"); s=a[1]; s = a[1]; for(i = 2; i < n; ++i) s = s "-" a[i]; print s}')
SVNAME=$(echo $BASENAME | awk '{n = split($0, a, "-"); print a[n]}')
DAEMON_CMD=/usr/local/${HADOOP_RELEASE}/bin/hadoop-daemon.sh
[ -f $DAEMON_CMD ] || exit -1
RETVAL=0
case "$1" in
start)
start
;;
stop)
stop
;;
restart)
stop
sleep 2
start
;;
*)
echo "Usage: ${HADOOP_RELEASE}-${SVNAME} {start|stop|restart}"
exit 1
;;
esac
exit $RETVAL
Second, place a script for pacemaker to kick this daemon services. There are pacemaker scripts under /usr/lib/ocf/resource.d/ .
- /usr/lib/ocf/resource.d/nhnjp/Hadoop
!/bin/bash
Resource script for Hadoop service
Description: Manages Hadoop service as an OCF resource in
an High Availability setup.
usage: $0 {start|stop|status|monitor|validate-all|meta-data}
The "start" arg starts Hadoop service.
The "stop" arg stops it.
OCF parameters:
OCF_RESKEY_hadoopversion
OCF_RESKEY_hadoopsvname
Note:This RA uses 'jps' command to identify Hadoop process
Initialization:
: ${OCF_FUNCTIONS_DIR=${OCF_ROOT}/lib/heartbeat}
. ${OCF_FUNCTIONS_DIR}/ocf-shellfuncs
USAGE="Usage: $0 {start|stop|status|monitor|validate-all|meta-data}";
usage()
{
echo $USAGE >&2
}
meta_data()
{
cat <<END
<?xml version="1.0"?>
<!DOCTYPE resource-agent SYSTEM "ra-api-1.dtd">
<resource-agent name="Hadoop">
<version>1.0</version>
<longdesc lang="en">
This script manages Hadoop service.
</longdesc>
<shortdesc lang="en">Manages an Hadoop service.</shortdesc>
<parameters>
<parameter name="hadoopversion">
<longdesc lang="en">
Hadoop version identifier: hadoop-[version]
For example, "1.0.2" or "0.20.2-cdh3u3"
</longdesc>
<shortdesc lang="en">hadoop version string</shortdesc>
<content type="string" default="1.0.2"/>
</parameter>
<parameter name="hadoopsvname">
<longdesc lang="en">
Hadoop service name.
One of namenode|secondarynamenode|datanode|jobtracker|tasktracker
</longdesc>
<shortdesc lang="en">hadoop service name</shortdesc>
<content type="string" default="none"/>
</parameter>
</parameters>
<actions>
<action name="start" timeout="20s"/>
<action name="stop" timeout="20s"/>
<action name="monitor" depth="0" timeout="10s" interval="5s" />
<action name="validate-all" timeout="5s"/>
<action name="meta-data" timeout="5s"/>
</actions>
</resource-agent>
END
exit $OCF_SUCCESS
}
HADOOP_VERSION="hadoop-${OCF_RESKEY_hadoopversion}"
HADOOP_HOME="/usr/local/${HADOOP_VERSION}"
[ -f "${HADOOP_HOME}/conf/hadoop-env.sh" ] && . "${HADOOP_HOME}/conf/hadoop-env.sh"
HADOOP_SERVICE_NAME="${OCF_RESKEY_hadoopsvname}"
HADOOP_PID_FILE="${HADOOP_PID_DIR}/hadoop-www-${HADOOP_SERVICE_NAME}.pid"
trace()
{
ocf_log $@
timestamp=$(date "+%Y-%m-%d %H:%M:%S")
echo "$timestamp ${HADOOP_VERSION}-${HADOOP_SERVICE_NAME} $@" >> /dev/null
}
Hadoop_status()
{
trace "Hadoop_status()"
if [ -n "${HADOOP_PID_FILE}" -a -f "${HADOOP_PID_FILE}" ]; then
# Hadoop is probably running
HADOOP_PID=`cat "${HADOOP_PID_FILE}"`
if [ -n "$HADOOP_PID" ]; then
if ps f -p $HADOOP_PID | grep -qwi "${HADOOP_SERVICE_NAME}" ; then
trace info "Hadoop ${HADOOP_SERVICE_NAME} running"
return $OCF_SUCCESS
else
trace info "Hadoop ${HADOOP_SERVICE_NAME} is not running but pid file exists"
return $OCF_NOT_RUNNING
fi
else
trace err "PID file empty!"
return $OCF_ERR_GENERIC
fi
fi
# Hadoop is not running
trace info "Hadoop ${HADOOP_SERVICE_NAME} is not running"
return $OCF_NOT_RUNNING
}
Hadoop_start()
{
trace "Hadoop_start()"
# if Hadoop is running return success
Hadoop_status
retVal=$?
if [ $retVal -eq $OCF_SUCCESS ]; then
exit $OCF_SUCCESS
elif [ $retVal -ne $OCF_NOT_RUNNING ]; then
trace err "Error. Unknown status."
exit $OCF_ERR_GENERIC
fi
service ${HADOOP_VERSION}-${HADOOP_SERVICE_NAME} start
if [ $? -ne 0 ]; then
trace err "Error. Hadoop ${HADOOP_SERVICE_NAME} returned error $?."
exit $OCF_ERR_GENERIC
fi
trace info "Started Hadoop ${HADOOP_SERVICE_NAME}."
exit $OCF_SUCCESS
}
Hadoop_stop()
{
trace "Hadoop_stop()"
if Hadoop_status ; then
HADOOP_PID=`cat "${HADOOP_PID_FILE}"`
if [ -n "$HADOOP_PID" ] ; then
kill $HADOOP_PID
if [ $? -ne 0 ]; then
kill -s KILL $HADOOP_PID
if [ $? -ne 0 ]; then
trace err "Error. Could not stop Hadoop ${HADOOP_SERVICE_NAME}."
return $OCF_ERR_GENERIC
fi
fi
rm -f "${HADOOP_PID_FILE}" 2>/dev/null
fi
fi
trace info "Stopped Hadoop ${HADOOP_SERVICE_NAME}."
exit $OCF_SUCCESS
}
Hadoop_monitor()
{
trace "Hadoop_monitor()"
Hadoop_status
}
Hadoop_validate_all()
{
trace "Hadoop_validate_all()"
if [ ! -n ${OCF_RESKEY_hadoopversion} ] || [ "${OCF_RESKEY_hadoopversion}" == "none" ]; then
trace err "Invalid hadoop version: ${OCF_RESKEY_hadoopversion}"
exit $OCF_ERR_ARGS
fi
if [ ! -n ${OCF_RESKEY_hadoopsvname} ] || [ "${OCF_RESKEY_hadoopsvname}" == "none" ]; then
trace err "Invalid hadoop service name: ${OCF_RESKEY_hadoopsvname}"
exit $OCF_ERR_ARGS
fi
HADOOP_INIT_SCRIPT=/etc/init.d/${HADOOP_VERSION}-${HADOOP_SERVICE_NAME}
if [ ! -d "${HADOOP_HOME}" ] || [ ! -x ${HADOOP_INIT_SCRIPT} ]; then
trace err "Cannot find ${HADOOP_VERSION}-${HADOOP_SERVICE_NAME}"
exit $OCF_ERR_ARGS
fi
if [ ! -L ${HADOOP_HOME}/conf ] || [ ! -f "$(readlink ${HADOOP_HOME}/conf)/hadoop-env.sh" ]; then
trace err "${HADOOP_VERSION} isn't configured yet"
exit $OCF_ERR_ARGS
fi
# TODO: do more strict checking
return $OCF_SUCCESS
}
if [ $# -ne 1 ]; then
usage
exit $OCF_ERR_ARGS
fi
case $1 in
start)
Hadoop_start
;;
stop)
Hadoop_stop
;;
status)
Hadoop_status
;;
monitor)
Hadoop_monitor
;;
validate-all)
Hadoop_validate_all
;;
meta-data)
meta_data
;;
usage)
usage
exit $OCF_SUCCESS
;;
*)
usage
exit $OCF_ERR_UNIMPLEMENTED
;;
esac
Pacemaker settings
First, using the crm_mon command, verify whether the heartbeat process is running.
# crm_mon
Last updated: Thu Mar 29 17:32:36 2012
Stack: Heartbeat
Current DC: NAMENODE01 (bc16bea6-bed0-4b22-be37-d1d9d4c4c213)-partition with quorum
Version: 1.0.12
2 Nodes configured, unknown expected votes
0 Resources configured.
============

Online: [ NAMENODE01 NAMENODE02 ]
After verifying the process is running, connect to pacemaker using the crm command and configure its resource settings. (This step is needed instead of haresource setting)
crm(live)# configure
INFO: building help index
crm(live)configure# show
node $id="bc16bea6-bed0-4b22-be37-d1d9d4c4c213" NAMENODE01
node $id="25884ee1-3ce4-40c1-bdc9-c2ddc9185771" NAMENODE02
property $id="cib-bootstrap-options"
        dc-version="1.0.12"
        cluster-infrastructure="Heartbeat"

# if this cluster is composed of two NameNode, the following setting is need.
crm(live)configure# property $id="cib-bootstrap-options" no-quorum-policy="ignore"

# vip setting
crm(live)configure# primitive ip_namenode ocf:heartbeat:IPaddr
params ip="192.168.32.3"

# drbd setting
crm(live)configure# primitive drbd_namenode ocf:heartbeat:drbd
        params drbd_resource="drbd01"
        op start interval="0s" timeout="10s" on-fail="restart"
        op stop interval="0s" timeout="60s" on-fail="block"
# drbd master/slave setting
crm(live)configure# ms ms_drbd_namenode drbd_namenode meta master-max="1"
master-node-max="1" clone-max="2" clone-node-max="1" notify="true"

# fs mount setting
crm(live)configure# primitive fs_namenode ocf:heartbeat:Filesystem
params device="/dev/drbd0" directory="/data/namenode" fstype="ext3"

# service daemon setting
primitive namenode ocf:nhnjp:Hadoop
        params hadoopversion="1.0.2" hadoopsvname="namenode"
        op monitor interval="5s" timeout="60s" on-fail="standby"
primitive secondarynamenode ocf:nhnjp:Hadoop
        params hadoopversion="1.0.2" hadoopsvname="secondarynamenode"
        op monitor interval="30s" timeout="60s" on-fail="restart"
Here, ocf:${GROUP}/${SERVICE} path corresponds with /usr/lib/ocf/resource.d/${GROUP}/${SERVICE}. So you should place your original service script there. Also lsb:${SERVICE} path corresponds with /etc/init.d/${SERVICE}.
Finnaly, you can confirm pacemaker's settings using the show command.
crm(live)configure# show
node $id="bc16bea6-bed0-4b22-be37-d1d9d4c4c213" NAMENODE01
node $id="25884ee1-3ce4-40c1-bdc9-c2ddc9185771" NAMENODE02
primitive drbd_namenode ocf:heartbeat:drbd
        params drbd_resource="drbd01"
        op start interval="0s" timeout="10s" on-fail="restart"
        op stop interval="0s" timeout="60s" on-fail="block"
primitive fs_namenode ocf:heartbeat:Filesystem
        params device="/dev/drbd0" directory="/data/namenode" fstype="ext3"
primitive ip_namenode ocf:heartbeat:IPaddr
        params ip="192.168.32.3"
primitive namenode ocf:nhnjp:Hadoop
        params hadoopversion="1.0.2" hadoopsvname="namenode"
        meta target-role="Started"
        op monitor interval="5s" timeout="60s" on-fail="standby"
primitive secondarynamenode ocf:nhnjp:Hadoop
        params hadoopversion="1.0.2" hadoopsvname="secondarynamenode"
        meta target-role="Started"
        op monitor interval="30s" timeout="60s" on-fail="restart"
group namenode-group fs_namenode ip_namenode namenode secondarynamenode
ms ms_drbd_namenode drbd_namenode
        meta master-max="1" master-node-max="1" clone-max="2"
        clone-node-max="1" notify="true" globally-unique="false"
colocation namenode-group_on_drbd inf: namenode-group ms_drbd_namenode:Master
order namenode_after_drbd inf: ms_drbd_namenode:promote namenode-group:start
property $id="cib-bootstrap-options"
        dc-version="1.0.12"
        cluster-infrastructure="Heartbeat"
        no-quorum-policy="ignore"
        stonith-enabled="false"
Once you've confirmed the configuration is correct, commit it using the commit command.
crm(live)configure# commit
Once you've run the commit command, heartbeat kicks each service following pacemaker's rules.You can monitor dead or alive using the crm_mon command.
$crm_mon -A

============
Last updated: Tue Apr 10 12:40:11 2012
Stack: Heartbeat
Current DC: NAMENODE01 (bc16bea6-bed0-4b22-be37-d1d9d4c4c213)-partition with quorum
Version: 1.0.12
2 Nodes configured, unknown expected votes
2 Resources configured.
============

Online: [ NAMENODE01 NAMENODE02 ]

 Master/Slave Set: ms_drbd_namenode
     Masters: [ NAMENODE01 ]
     Slaves: [ NAMENODE02 ]
 Resource Group: namenode-group
     fs_namenode        (ocf::heartbeat:Filesystem):    Started NAMENODE01
     ip_namenode        (ocf::heartbeat:IPaddr):        Started NAMENODE01
     namenode   (ocf::nhnjp:Hadoop):    Started NAMENODE01
     secondarynamenode  (ocf::nhnjp:Hadoop):    Started NAMENODE01

Node Attributes:
* Node NAMENODE01:
    + master-drbd_namenode:0            : 75
* Node NAMENODE02:
    + master-drbd_namenode:1            : 75
Finally, you should test the various failover tests. For example, kill each service daemon and cause pseudo-network failures using iptables.