
Introduction
Any app that is a vital part of your service will eventually need debugging tools that can be used in its dev or alpha phase. These tools help the developers, QA, and leaders set up quality testing environments quickly during development. Having an overview allows us to reduce development and testing periods by a large margin. LINE has tools that provide hundreds of debugging features like this, and they’re still increasing day by day.
It’s important to maintain documentation that can help others understand what kind of debugging features are available, but keeping this documentation up-to-date with actual list of features is a difficult task.
There we had a problem, and we needed a solution to the question:
How do we generate debug menu documentation that can be shared with members and updated automatically?
Requirements overview
To answer the question, we broke down the requirements into smaller pieces:
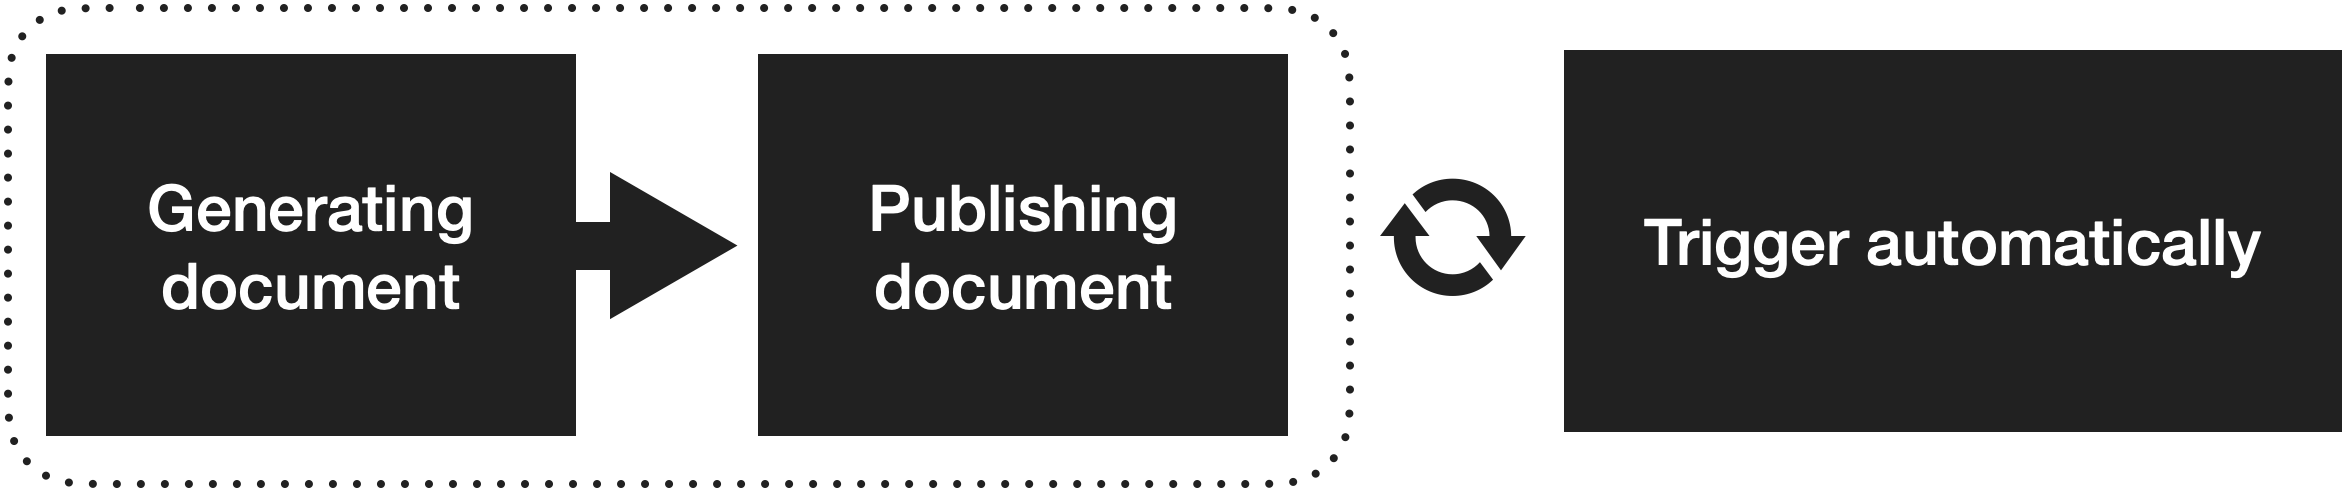
As you can see, there were three main capabilities that our documentation tool needed to have:
- Generating documentation: We had to figure out how to generate documentation from Swift files.
- Publishing documentation: We had to figure out how to make the generated documentation visible to other members.
- Triggering automatically: If we could solve the two problems above, the only thing we had to do then was to execute them automatically or periodically.
Let's jump to the implementation and see how we resolved all of them in detail.
Implementation
Generating documentation
The idea that came to us was inspired by Web Crawler; the crawler can make HTTP requests to get a response and retrieve all the needed data from URLs.
So, could we make a Swift Crawler similar to Web Crawler? We could if we could structuralize the information from the Swift file, right? Fortunately, there was a library officially released from Apple named SwiftSyntax that helped us structuralize any Swift file into the AST tree format. That's it, that's what we need!
SwiftSyntax
SwiftSyntax has three main classes named SyntaxParser, Visitor, and Rewriter that helps you read and modify Swift files:
- SyntaxParser: Parses Swift files to AST Tree format.
- Visitor: Reads information from Swift files.
- Rewriter: Modifies the Swift file while looking into this; we can use this one and then return the other AST formats, then SwiftSyntax will replace them with the new one.
These are some tools that use SwiftSyntax as the core of their features:
- Piranha: Helps you clean the feature flags that are not compiled.
- swift-doc: Helps you generate documentation.
- periphery: Helps you remove unused resources, classes and so on.
As you can see, these libraries are powerful. Since we already knew our debugging menu architecture, we could use SwiftSyntax to get all the information from our debugging feature list.
We created a command-line tool that receives file paths (related to the debugging menu) as input and generates HTML files as output. We named it dmcrawler: which is shorthand for Debug Menu Crawler.
The HTML files contain:
|
Filename
|
Description
|
|---|---|
| index.html |
The UI frame and supporting features like searching, references, and so on |
| main.css | Appearance configurations for the website |
| body.css | Appearance configurations for the content |
| body.html | The debugging feature list |
The three first files (index.html, main.css, body.css) are fixed and won't change until we need to update the UI or need to support more features on the website. => body.html is the only file we need the dmcrawler tool to generate.
dmcrawler

Pipeline
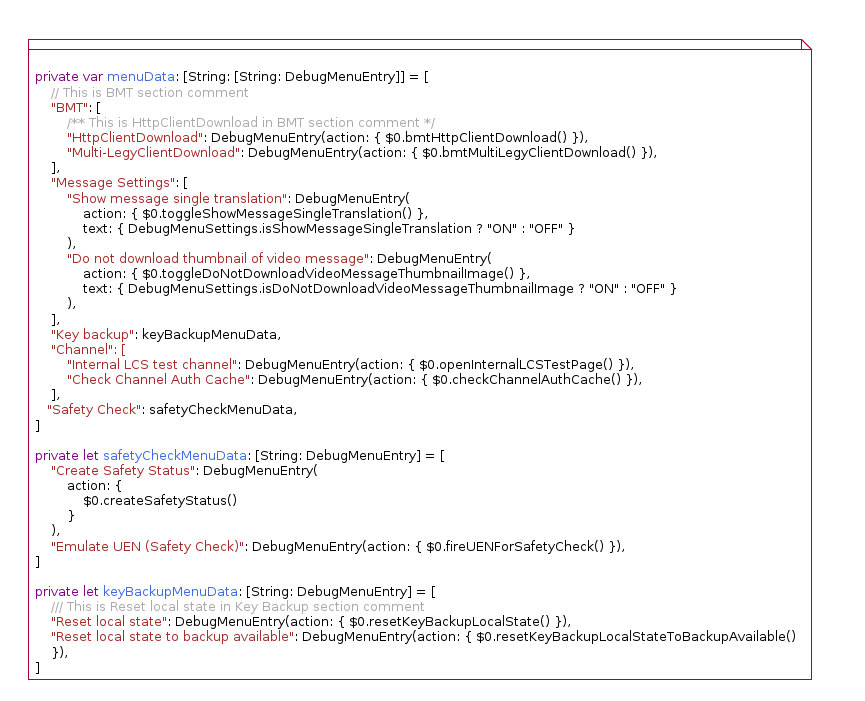
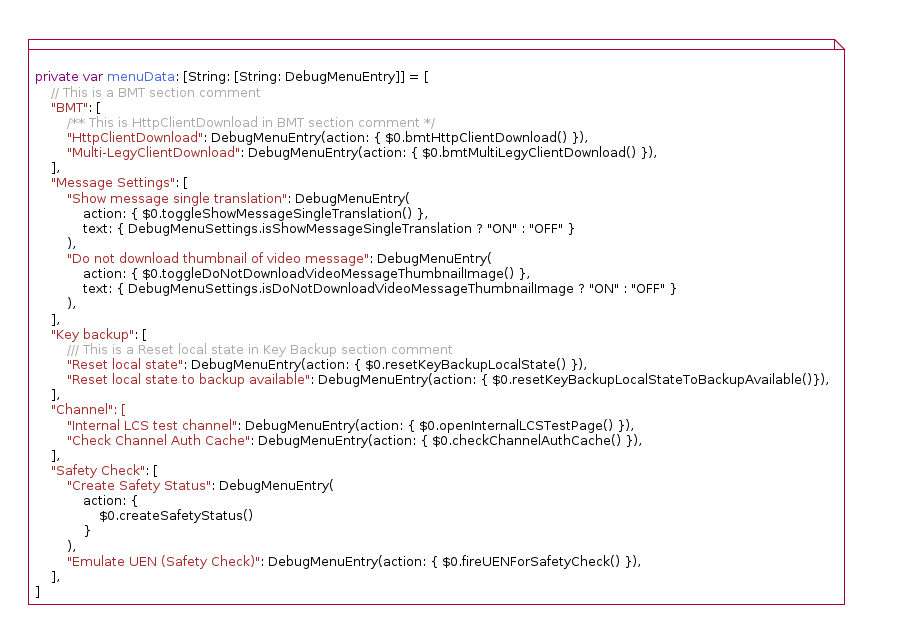
Let’s take a look at a lightened version of the source file. We had a lot of unnecessary chunks of code, while our goal was to only crawl the data that we needed from the file.
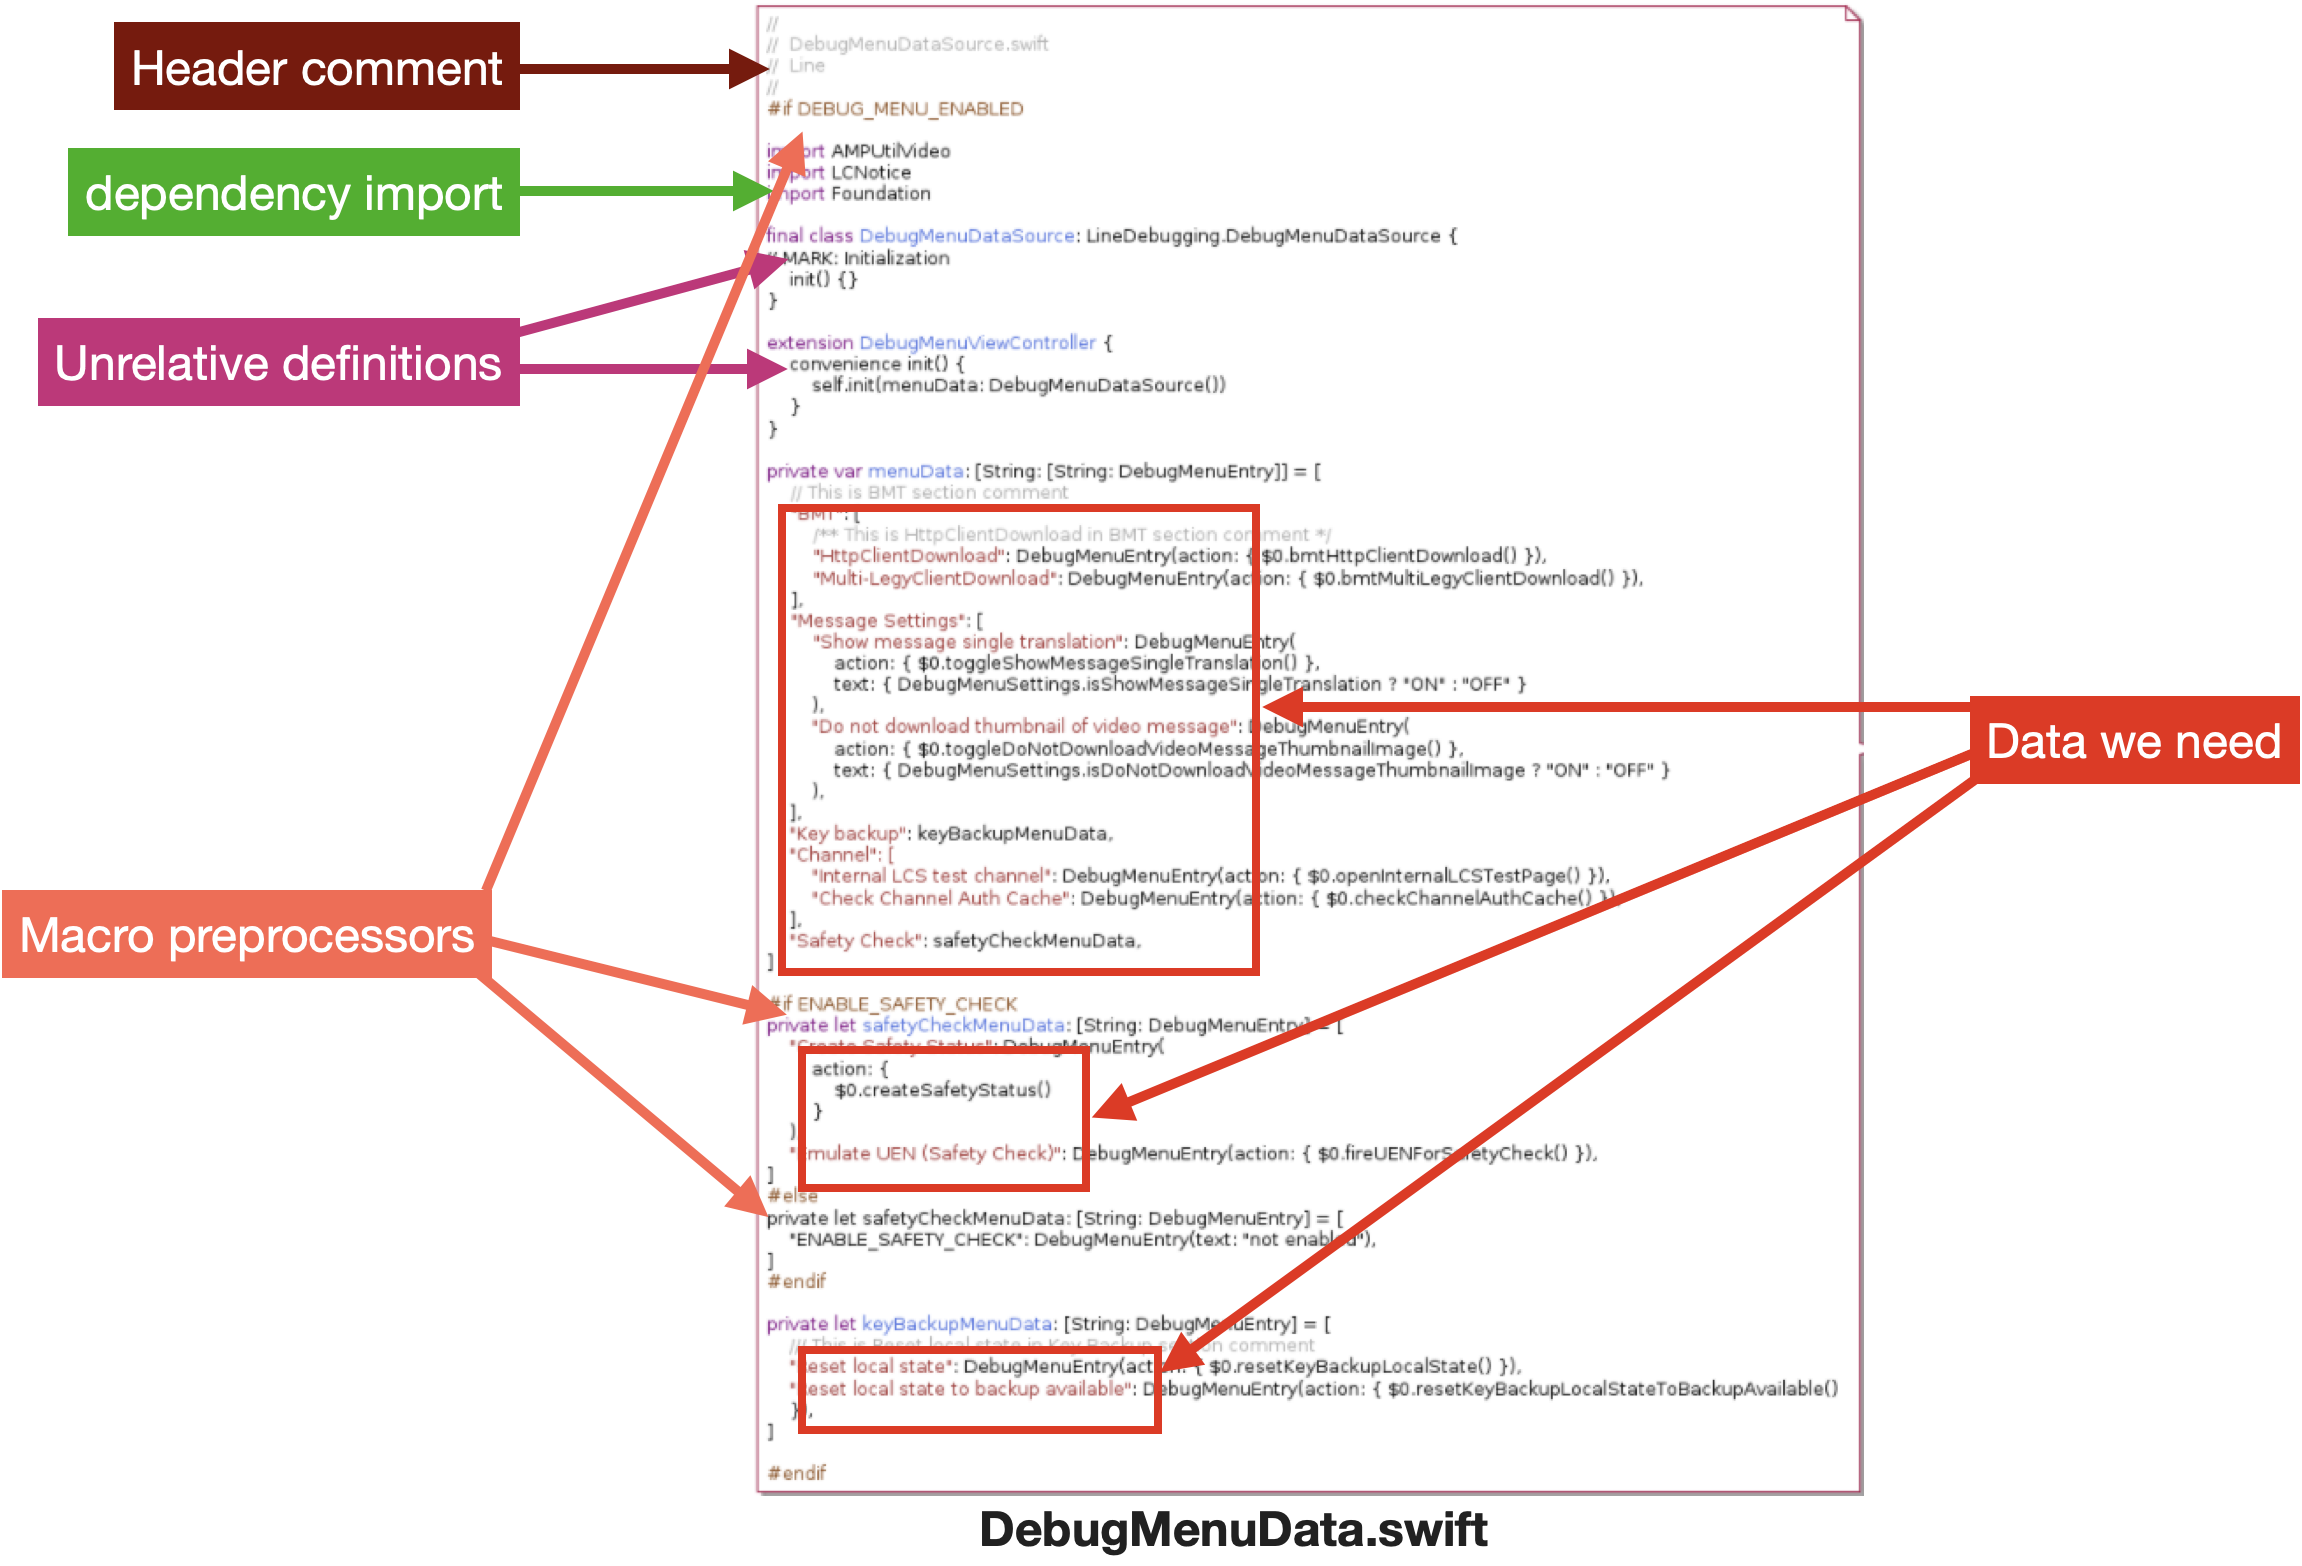
We needed to break this down into smaller problems. The idea was to clean the source file step by step until only the debugging definition data was left to get.
The stream pattern was the best architecture for this since we only cared about the input and the output. Using the stream pattern allowed us to split the problem into more minor tasks; it's easier to maintain small stream nodes, and we can scale them in the future.
Because a streaming node can be a SyntaxRewriter or a SyntaxVisitor; they have small differences during use:
SyntaxRewriteruses thewalk()method and produces the output.SyntaxVisitoruses thevisit()method and doesn't produce the output.
To solve that, we defined the Visitable protocol to standardize the API when working with both SyntaxRewriter and SyntaxVisitor together.
public protocol Visitable {
    typealias Input = Syntax
    typealias Output = Syntax


    /// Takes ``Input`` and produces ``Output``
    ///
    /// - Parameter input: The input to receive from upstream
    /// - Returns: The ``Output`` this Visitor/Rewriter produces
    func walkOrVisit(_ input: Input) -> Output
}Streamable protocol:public protocol Streamable {
/// Create chaining with other ``SyntaxStream``
/// The ``Output`` of this chainable should be the same type as ``Input`` of downstream
///
/// - Parameter downstream: The downstream
/// - Returns: ``downstream`` itself
func append(downstream: SyntaxStream) -> SyntaxStream
func retrieveUpstream() -> SyntaxStream?
}SyntaxRewriter and SyntaxVisitor need to conform to these protocols so that they and their inheritance classes can be chained together.We created four stream nodes working to separate our work:
CleaningRewriter
CleaningRewriter cleans all the unnecessary code that is not related to the data we want to crawl (importing, uncompiled code, unrelated classes, and so on).
- To remove import declarations, override the
visit(_ node: ImportDeclSyntax) -> DeclSyntaxfunction and return blank syntax:
class CleaningRewriter: SyntaxRewritter { public override func visit(_ node: ImportDeclSyntax) -> DeclSyntax { DeclSyntax(SyntaxFactory.makeBlankUnknownDecl()) } }
- To remove uncompiled code, override
visit(_ node: CodeBlockItemSyntax) -> Syntax, then if the block syntax isIfConfigDeclSyntax, we need to know which part is enabled by writing the conditional algorithm, then only the compiled component will be returned.
extension CleaningRewriter { public override func visit(_ node: CodeBlockItemSyntax) -> Syntax { guard let ifConfigDeclSyntax = node.item.as(IfConfigDeclSyntax.self) else { return super.visit(node) } /* A clause list may be a part of #if, #elif, #else or #endif */ let clauseList = ifConfigDeclSyntax.crawler_clauseList if let enableClause = clauseList .crawler_getEnableClause(flagChecker: { Configurations.isFlagEnabled(flag: $0) }) { return CodeBlockItemSyntax.init { builder in builder.useItem(visit(enableClause.elements)) }._syntaxNode } // If there is no part enabled, returns blank syntax to clean them all return SyntaxFactory.makeBlankCodeBlockItem()._syntaxNode } }
FilteringVisitor
FilteringVisitor gets all variables related to debugging menu declaration.
Because we already know the declaration of debugging menu data source (its name - menuData - is a dictionary containing Section names as keys and a list of DebugMenuItem as values).
So the idea of this visitor is to try getting the menuData variable and all the variables that are contained inside the menuData.
Collect all the variable declaration or extension declaration if it's a type of [String: DebugMenuEntry]:
class FilteringRewritter: SyntaxVisitor {
  public override func visit(_ node: CodeBlockItemListSyntax) -> Syntax {
    let codeBlocks = .. // extract node syntax to list of codeBlock syntax

    var filteredSyntax = ...
    for codeBlock in clodeBlocks {
      if let variableDeclSyntax = codeBlock.item.as(VariableDeclSyntax.self) {
      // Variable declaration -> collect if this variable is type of [String: DebugMenuEntry]
      }
      else if let extensionDeclSyntax = codeBlock.item.as(ExtensionDeclSyntax.self) {
      // Extension declaration -> collect if this declaration is type of [String: DebugMenuEntry]
      }
    }


    return filteredSyntax
  }
}BindingRewriter
BindingRewriter gets all variables related to debugging menu declaration.
From the output of FilteringRewriter above, we want all the related variables must be added directly into menuData.
To do so, we need to adjust the menuData AST Syntax and append all the declarations into one.
class BindingRewriter: SyntaxRewritter {
public override func visit(_ node: CodeBlockItemListSyntax) -> Syntax {
let newDebugMenuDeclSyntax = bindingElements(...)
return SyntaxFactory.makeCodeBlockItemList([
debugMenuSyntax.withItem(newDebugMenuDeclSyntax._syntaxNode),
])._syntaxNode
}
}
CrawlingVisitor
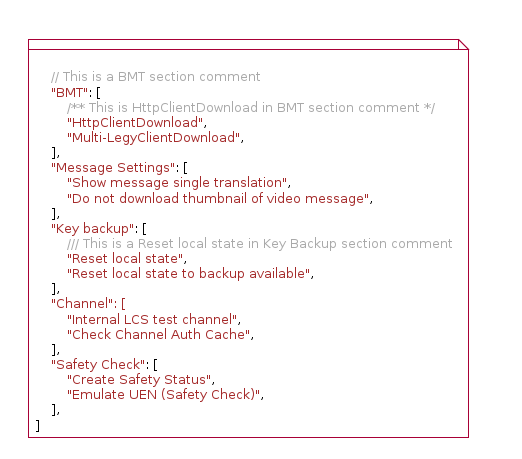
CrawlingVisitor structuralizes the final single variable by looking into every value and then storing them in a format like [Section_Name: [Feature_Information]].
The input of CrawlingVisitor is the BindingRewriter's output - that is the menuData dictionary AST syntax including all related data from other variables.
At this time, we are able to look up its syntax and get all the information we need by overriding the visit(_ node: DictionaryElementListSyntax) -> SyntaxVisitorContinueKind function:
class CrawlingVisitor: SyntaxVisitor {
  public override func visit(_ node: DictionaryElementListSyntax) -> SyntaxVisitorContinueKind {
    let sections = node.crawler_elements
    for section in sections {
      // Crawl data
     }
    return .skipChildren
  }
}
SwiftArgumentParser
Since dmcrawler is a command-line tool; we used SwiftArgumentParser to make it has a standard APIs.
SwiftArgumentParser requires the main struct to add the @main attribute, conform to the ParsableCommand protocol and then implement the command's logic in the run() method. There are 3 built-in propertyWrappers that allow us to add arguments into our command-line tool:
@Flag: Add a boolean argument@Option: Add an optional argument@Argument: Add a requirement argument
These argument types also allow adding shorthand (.customShort) and descriptions (help) for each argument.
In our case, we need the working directory root and source file paths of debug menu files, and the destination file path for the generated HTML files, so the implementation looks like this:
import ArgumentParser


@main
struct DMCrawler: ParsableCommand {
    @Option(name: [.customShort("o"), .long], help: "Output path for writing debug menu html file")
    var outputPath: String


    @Option(name: [.customShort("s"), .long], help: "Debug menu source file path")
    var sourcePaths: [String]


    @Argument(help: "Working directory path")
    var workingDirectory: String


    mutating func run() throws {
        // Gets argument information and runs our tasks
    }
}
When executing dmcrawler -h or dmcrawler --help, this is what we get:
ARGUMENTS:
  <working-directory>     Working directory path


OPTIONS:
  -o, --output-path <output-path>
                          Output path for writing debug menu html file
  -s, --source-paths <source-paths>
                          Debug menu source file path
  -h, --help              Show help information.
Result
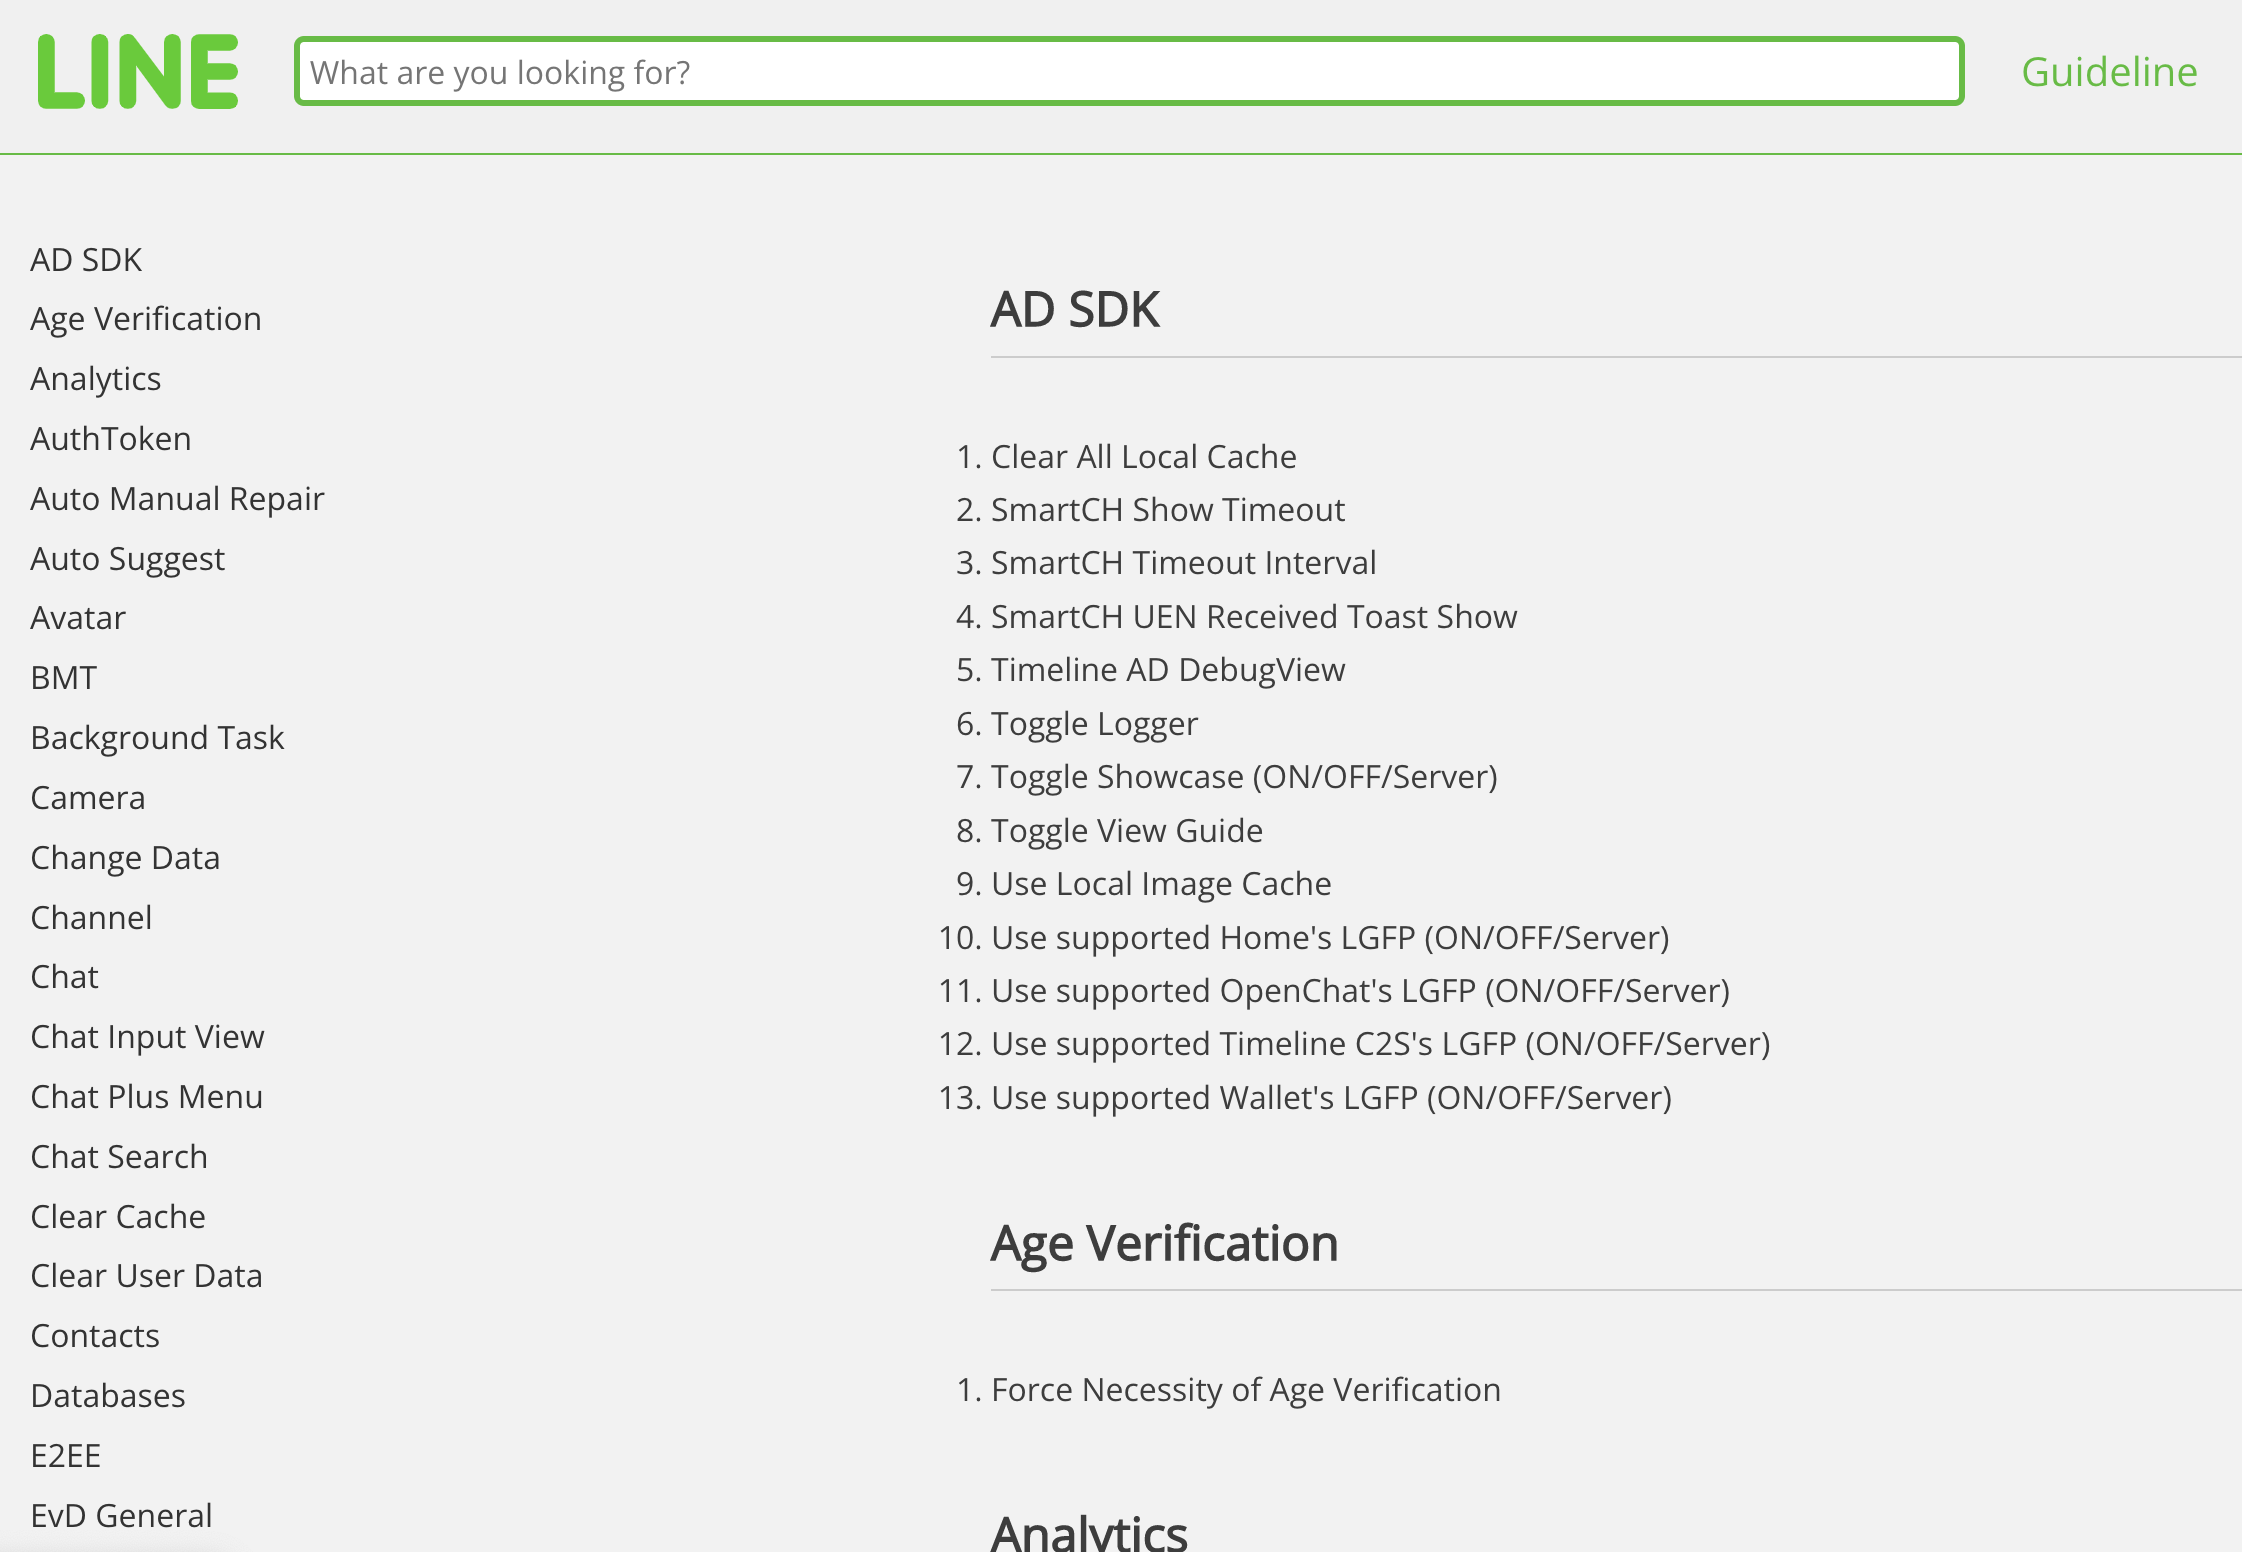
Finally, we have the output HTML. Opening the index.html file in a browser will give you a screen like the one below.
Publishing documentation
Another problem we need to solve is where the HTML files should be stored; they must only be visible to our organization for security.
We are concerned with three possible options for this:
Store in the LINE repository and then embed the URL to our wiki
We intended to generate a single Markdown or HTML file, store it right in our repository, and embed the URL into our wiki. It's an easy solution, but to embed the URL into our wiki, we need to grant access permission to our repository by generating access tokens.
This leads to a security problem if someone knows our access token, which would be terrible for us.
Store in internal repository
Another solution is to create a repository to store our generated file; we can embed the URL into our wiki or permit our members to access this repository.
It works, but it's not the best idea since this repository is too much for what we actually need.
Store in cloud storage service
This is our final conclusion after discussing all the proposals.
As a side note, we only noticed when our team discussed this that we had an internal service that can help us store our resources. The internal service called Verda uses AWS S3 under the hood. AWS S3 has a great feature that allows us to host websites from stored files.
To work with Verda, we created a bucket and used the s3cmd command-line tool to upload, delete, update or modify the permission access of any data in that bucket.
Triggering automatically
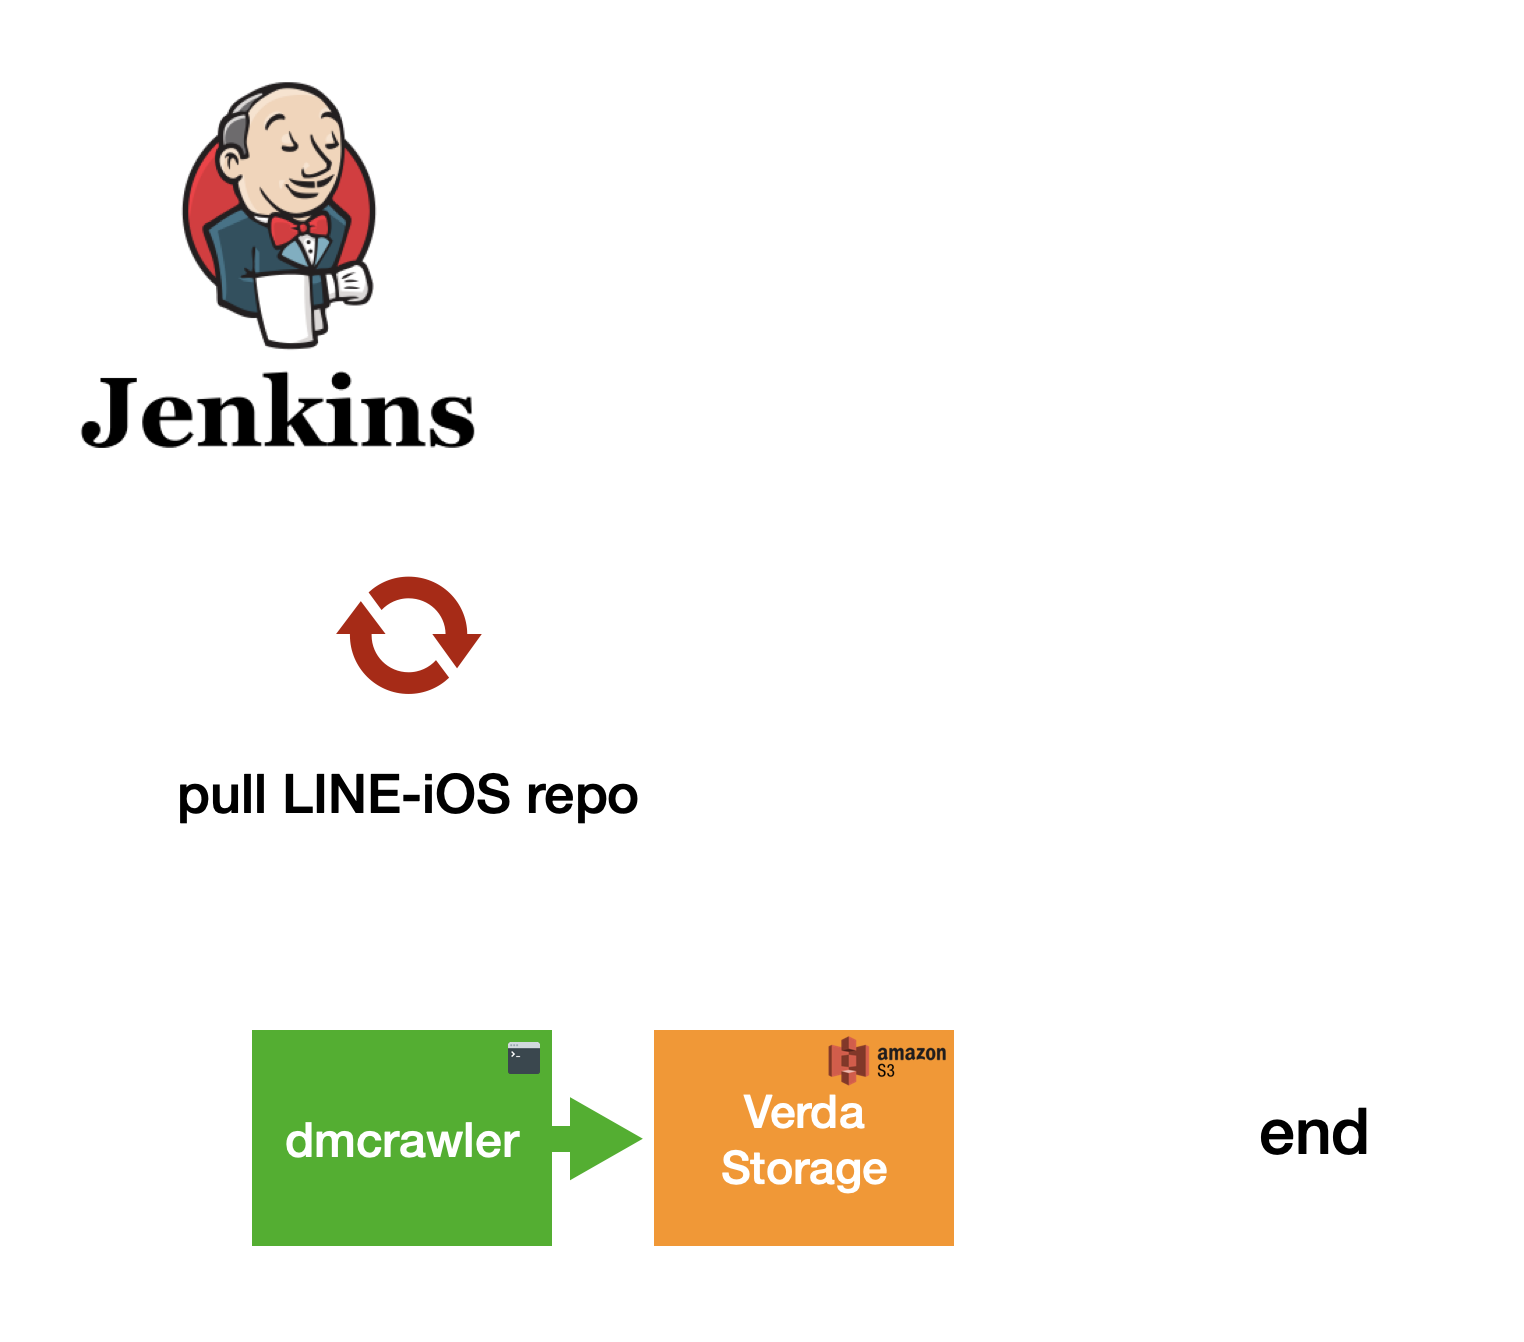
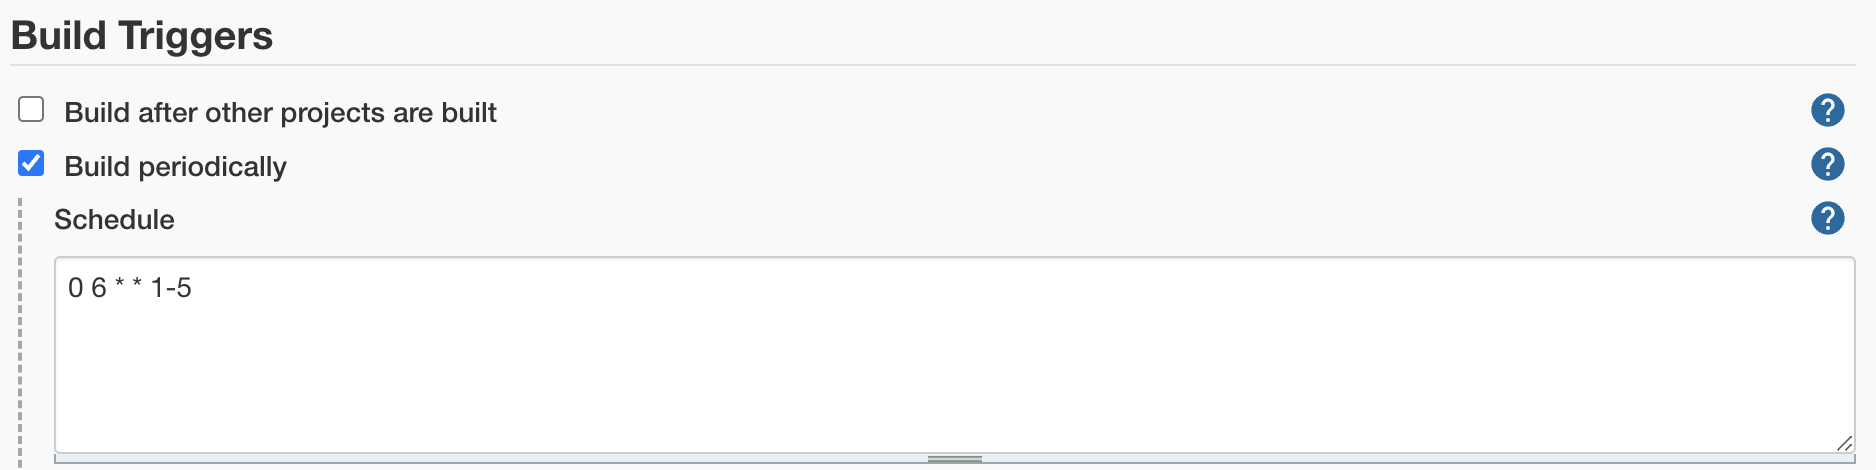
Finally, we only need to make it automatically by using Jenkins jobs to help us do all these things every morning.
Since the Jenkins node needs to know about our repository and AWS-S3 APIs, we needed to set up the environments to have the proper access to our repository and the s3cmd tool to communicate with the AWS-S3 service.
pipeline {
    agent { node { label '<node_label>' } }

    stages {
        stage('Checkout') {
            steps {
                checkout changelog: false, ...
            }
        }
        stage('Generate') {
            steps {
                sh '''
                cd <dmcrawler_path>
                ./dmcrawler '${WORKSPACE}' -s '<source_path_1>' -s '<source_path_2>' -o <output_path>
                '''
            }
        }
        stage('Upload') {
            steps {
                sh '''
                VOS_ACCESS_KEY='<vos_accesskey>'
                VOS_SECRET_KEY='<vos_secretkey>'
                HOST='<host.com>'
                HOST_BUCKET='<debugmenu.host.com>'
                FILE_PATH="<file_path>"

                s3cmd --access_key=${VOS_ACCESS_KEY} --secret_key=${VOS_SECRET_KEY} --host=${HOST} --host-bucket=${HOST_BUCKET} put --acl-public ${FILE_PATH} s3:<bucket_file_path>
                '''
            }
        }
    }
}
Conclusion
- SwiftSyntax allows us to parse Swift files to AST format so that we can read and modify the Swift file the way we want.
- Verda using AWS S3 under the hood allows us to upload files onto cloud storage, enables us to host websites from stored files, and has SDKs for many languages such as Bash, Python, JS, among others
- Jenkins is a powerful CI/CD tool; in our case, we can use it to schedule our work periodically.
What is already done:
The auto-generation tool has been released and works like a charm for now:
- We don't have to maintain our wiki docs anymore; the debugging list will be synced daily as soon as possible.
- The wiki docs have elegant UI/UX and can be improved even better.
- QA teams can trust this debugging list website to understand what it can do; since we also crawl all the comments from our code as the description, we can improve this wiki doc in more detail.
What needs improvement:
Besides what we have done, there are some things that we think can be improved:
- Instead of scheduling daily, we can hook the
masterbranch to know when the debugging Swift file has changed, and then we can trigger the generator more effectively. - The website can hold many versions of the debug menu for each release version so that other people who work on older versions can also use this wiki as their material.