
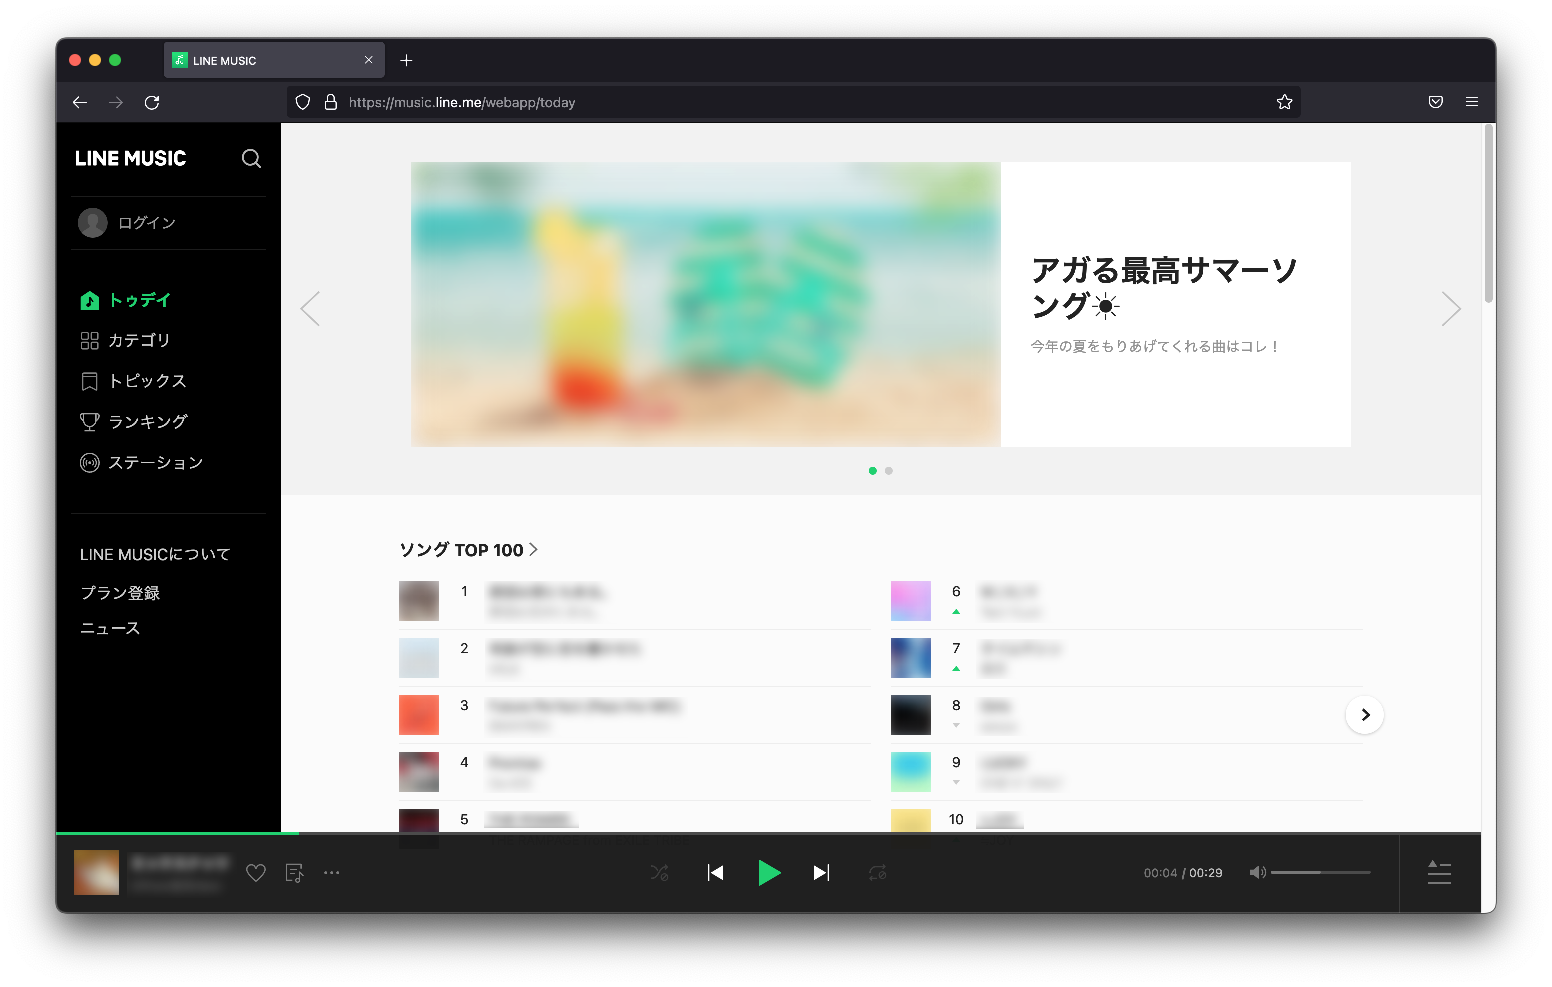
Hi, I'm Shibasaka Hiroyuki, a front-end engineer at LINE Kyoto development office. Do you listen to music on your computer while working or studying? Not only is LINE MUSIC available as a smartphone app, it's also available as a web application. The web app that we've developed, uses Vue.js as its JS framework.
Previously, this web app had used Vue 2, but in June 2022, we newly released a version upgraded to Vue 3. In parallel with function development for this web app, my team was also engaged in improving its performance. Performance is a simple term but it has various aspects, among which a huge bundle size was a major challenge for us. The bundle size of js and css, components of the app, is 6 MB. When measuring accesses to the web app using a monitoring tool called Sentry, we found that half of them spent two or more seconds before displaying the app page.
We made efforts to reduce the size through refactoring, including optimizing dependent packages. While collecting information of Vue.js during this process, we learned that upgrading to Vue 3 is expected to reduce the bundle size. Since we already had a plan to migrate to Vue 3, partly as preparation for introducing TypeScript in the future, we decided to place migration as our top priority.
In this retrospective, I'll share how we proceeded with this migration and on which points we used our expertise. I'll also share how significantly the performance was improved, along with specific results.
Upgrading using the “Migration Build”
Upgrading to Vue 3 required a lot of changes, and it was extremely difficult to accurately make all of those changes at the same time. Thankfully, a "migration build" of Vue 3 called @vue/compat was available. By installing this migration build simultaneously with a Vue.js upgrade, you can run Vue 3 with minimum adjustments. Additionally there's a Vue 3 Migration Guide that documents the required changes so that your migration process will go smoothly.
After installing the migration build, it will display errors or warnings pointing to locations that need to be modified. Your migration process will be relatively painless as long as you fix these errors one after the other.
The migration build also takes care of upgrading the many dependent packages in use. We were able to successfully complete the whole process by upgrading each package and confirming its operation one at a time.
Step 1: First, make Vue 3 ready for operation
- Upgrade vue-cli and Vue.js
- Install @vue/compat and enable compat mode
- Align webpack-dev-server settings with the version change
- Correct compile errors
Upgrading @vue/cli-service changes the webpack-dev-server version from v3 to v4, which may require some changes in its settings. During our upgrade, some dependent packages stopped working, so we upgraded them as well. The major version change required a significantly time-consuming process of aligning these packages as well. We needed to make such alignments on various locations.
By the end of the first step, Vue gets ready for operation on a dev server.
Step 2: Make alignments with major specification changes
Here, the migration document requires the following two alignments:
- Alignment with the specification change of the
<transition>class name - Alignment with a new global mount API
The Vue 3 Migration Guide makes a note of letting you know that <transition> class names will not give you any runtime warnings, so you should remember to update them beforehand.
Changes related to the new global mount API are a little more extensive. Many methods have been changed and some have been removed, so you will need to make many changes to each of them accordingly. At this stage, we also upgraded Vue i18n as it had stopped working. Official documentation is also available for Vue i18n migration, so you can refer to it if necessary.
Incidentally, `this` cannot be used as a Vue instance anymore in Vue 3 when setting a default value for `props`. If you're calling Vue i18n text in a way as shown below you'll need to make changes:
props: {
  title: {
    type: String,
    default() {
      return this.$t('title'); // It will not work
    },
  },
}
Step 3: Upgrade major packages
Next, we upgraded Vuex and Vue-router.
We assumed this to be the most difficult part before starting our project, but apparently the upgrade process is quite simple in most cases including ours. We didn't need to make any changes other than those specified in the guide.
Step 4: Correct errors and upgrade dependent packages
Now that major changes have been completed and dependent packages have all been upgraded, you might assume that your work is nearly done. Realistically however, you will spend long hours correcting the remaining errors and warnings one at a time. This is because you will encounter some aspects that will require you to look for the cause. We only spent about a full working day on the process up to this point, but it took about six days in total to correct the errors and test code. Since we also had to work on other projects in parallel, it took about one month in total to complete the entire upgrade.
At this point you may find dependent packages that must be upgraded, or encounter packages that output errors only after being executed on a browser. Our approach for the migration process was to "upgrade each package in sequence whenever we encounter an error", and so far we had no problems with this policy. We hope this will give you some extra courage for starting your migration.
Our workflow was to first correct the warnings displayed in the terminal (errors already solved at this stage) and then address the warnings and errors in the browser console. Different browser errors can occur on different pages and components, so you need to identify problems on each package in use by displaying where it's used and and then confirm that it works properly.
Regarding some errors output at runtime, it was difficult to understand which exact change caused the errors. This is why it's important to commit frequently; being able to return to any stage of development and being able determine the cause of an error will make your job that much easier.
Step 5: Correct the test code
Lastly, we corrected the test code.
This project uses Vue Testing Library, which we also needed to upgrade for Vue 3. However, no migration guides were available. As of April 2022, when we worked on this project, we had to collect whatever relevant information there was by reading the source code and sample code that was available on the next branch of Vue 3.
Big changes in particular lie in how to handle Vuex and Vue-router. Previously, each instance was created within the render function and could be handled with the Vue instance as the third argument of the render function.
Since this feature has been removed in the new version, you need to create Vuex and Vue-router instances by yourself.
We wrote a unit test by creating a render wrapper function. The following figures show how we changed this to align with the new version:
Before
export const initAndRender = (TestComponent, options, configure) => {
  return render(TestComponent, options, (vue, store, router) => {
    /* common settings */

    const addtionalResponse = configure ? configure(vue, store, router) : {};
    return { ...(addtionalResponse ? addtionalResponse : {}) };
  });
};
After
export const initAndRender = (TestComponent, options) => {
  const global = options?.global || {};
  const plugins = global?.plugins || [];

  /* common settings */

  // vuex
  if ('store' in options) {
    const storeInstance = createStore(options.store);
    plugins.push(storeInstance);
    delete options.store;
  }

  // vue-router
  const router = createRouter({
    history: createWebHistory(),
    routes: [...(options.routes || [])],
  });
  plugins.push(router);
  delete options.routes;

  // merge options
  global.plugins = plugins;
  global.mocks = mocks;
  options.global = global;

  return { ...render(TestComponent, options), router };
};
Between the above two code excerpts, the two major differences are that the third argument of the render function has been removed, and that the descriptions for Vuex and Vue-router have been added. To reduce changes on the test code side, we ensured that we can continue to use each option of `store` and `routes` without any major changes and that the instances for Vuex and Vue-router are created on the wrapper function side. In addition, Vue-router instances created within `render` were used in some locations, so we ensured that we can continue to handle `router` in a test by returning `router` together with the contents of `render` . We are pleased that our original render wrapper function has enabled us to absorb major changes within it.
We made more modifications in many other places in the test code, and passing all tests required a lot of trial and error.
Step 6: Finishing up
To finish up, remove the migration build that we used so far. If this doesn't output any error, you have completed a web application that correctly works with Vue 3!
After completing our development, we asked the QA team to conduct a regression test to confirm the entire operation. Some bugs are bound to remain even after all that work, so it is important to carry out this type of testing. After correcting all detected bugs, we officially released the new web app.
Actual improvement 1: Bundle size
Now it's time to reveal how the performance has actually been improved. We recorded how much the bundle size had changed between before introducing Vue 3 and the migration build, immediately after the introduction, and after removing the migration build.
First, we compared the bundle size when built in development mode. The graph below shows the following from left to right:
- Before migration
- Immediately after introducing Vue 3 and the migration build (step 1)
- After migration (removing the migration build) (step 6)
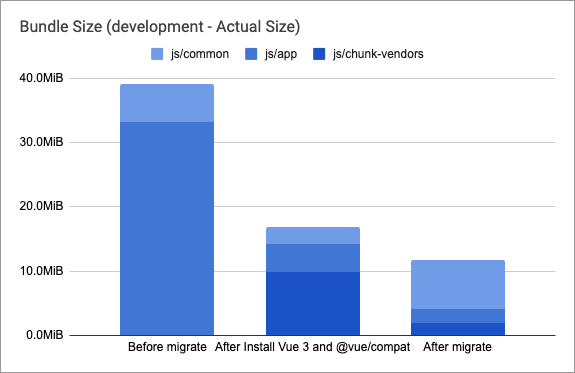
The bar in the center shows that the bundle size decreased by half simply by upgrading to Vue 3. My team was very surprised when I reported this result. The bundle size was reduced even further after completion of the migration and removal of the migration build to make a pure Vue 3 application.
Next are the build results in production mode. The file configuration is slightly different because the CSS included within js in development mode is externalized.
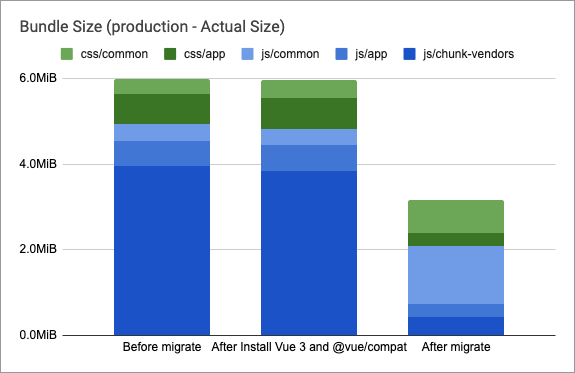
While the migration build is still included the app may behave like it's still on Vue 2, with the bundle size remaining almost the same as before the migration. On the other hand, you can reduce the bundle size by half by removing the migration build to make a pure Vue 3 application.
Actual improvement 2: Page display speed and its score
In parallel with adopting Vue 3, we also adopted Vite: a front-end development environment that replaces webpack. Vite comes equipped with a high-speed dev server and a powerful compiler so that it can output files subdivided for each component. Since it only loads files necessary for the accessed page, the page loading speed can be improved further.
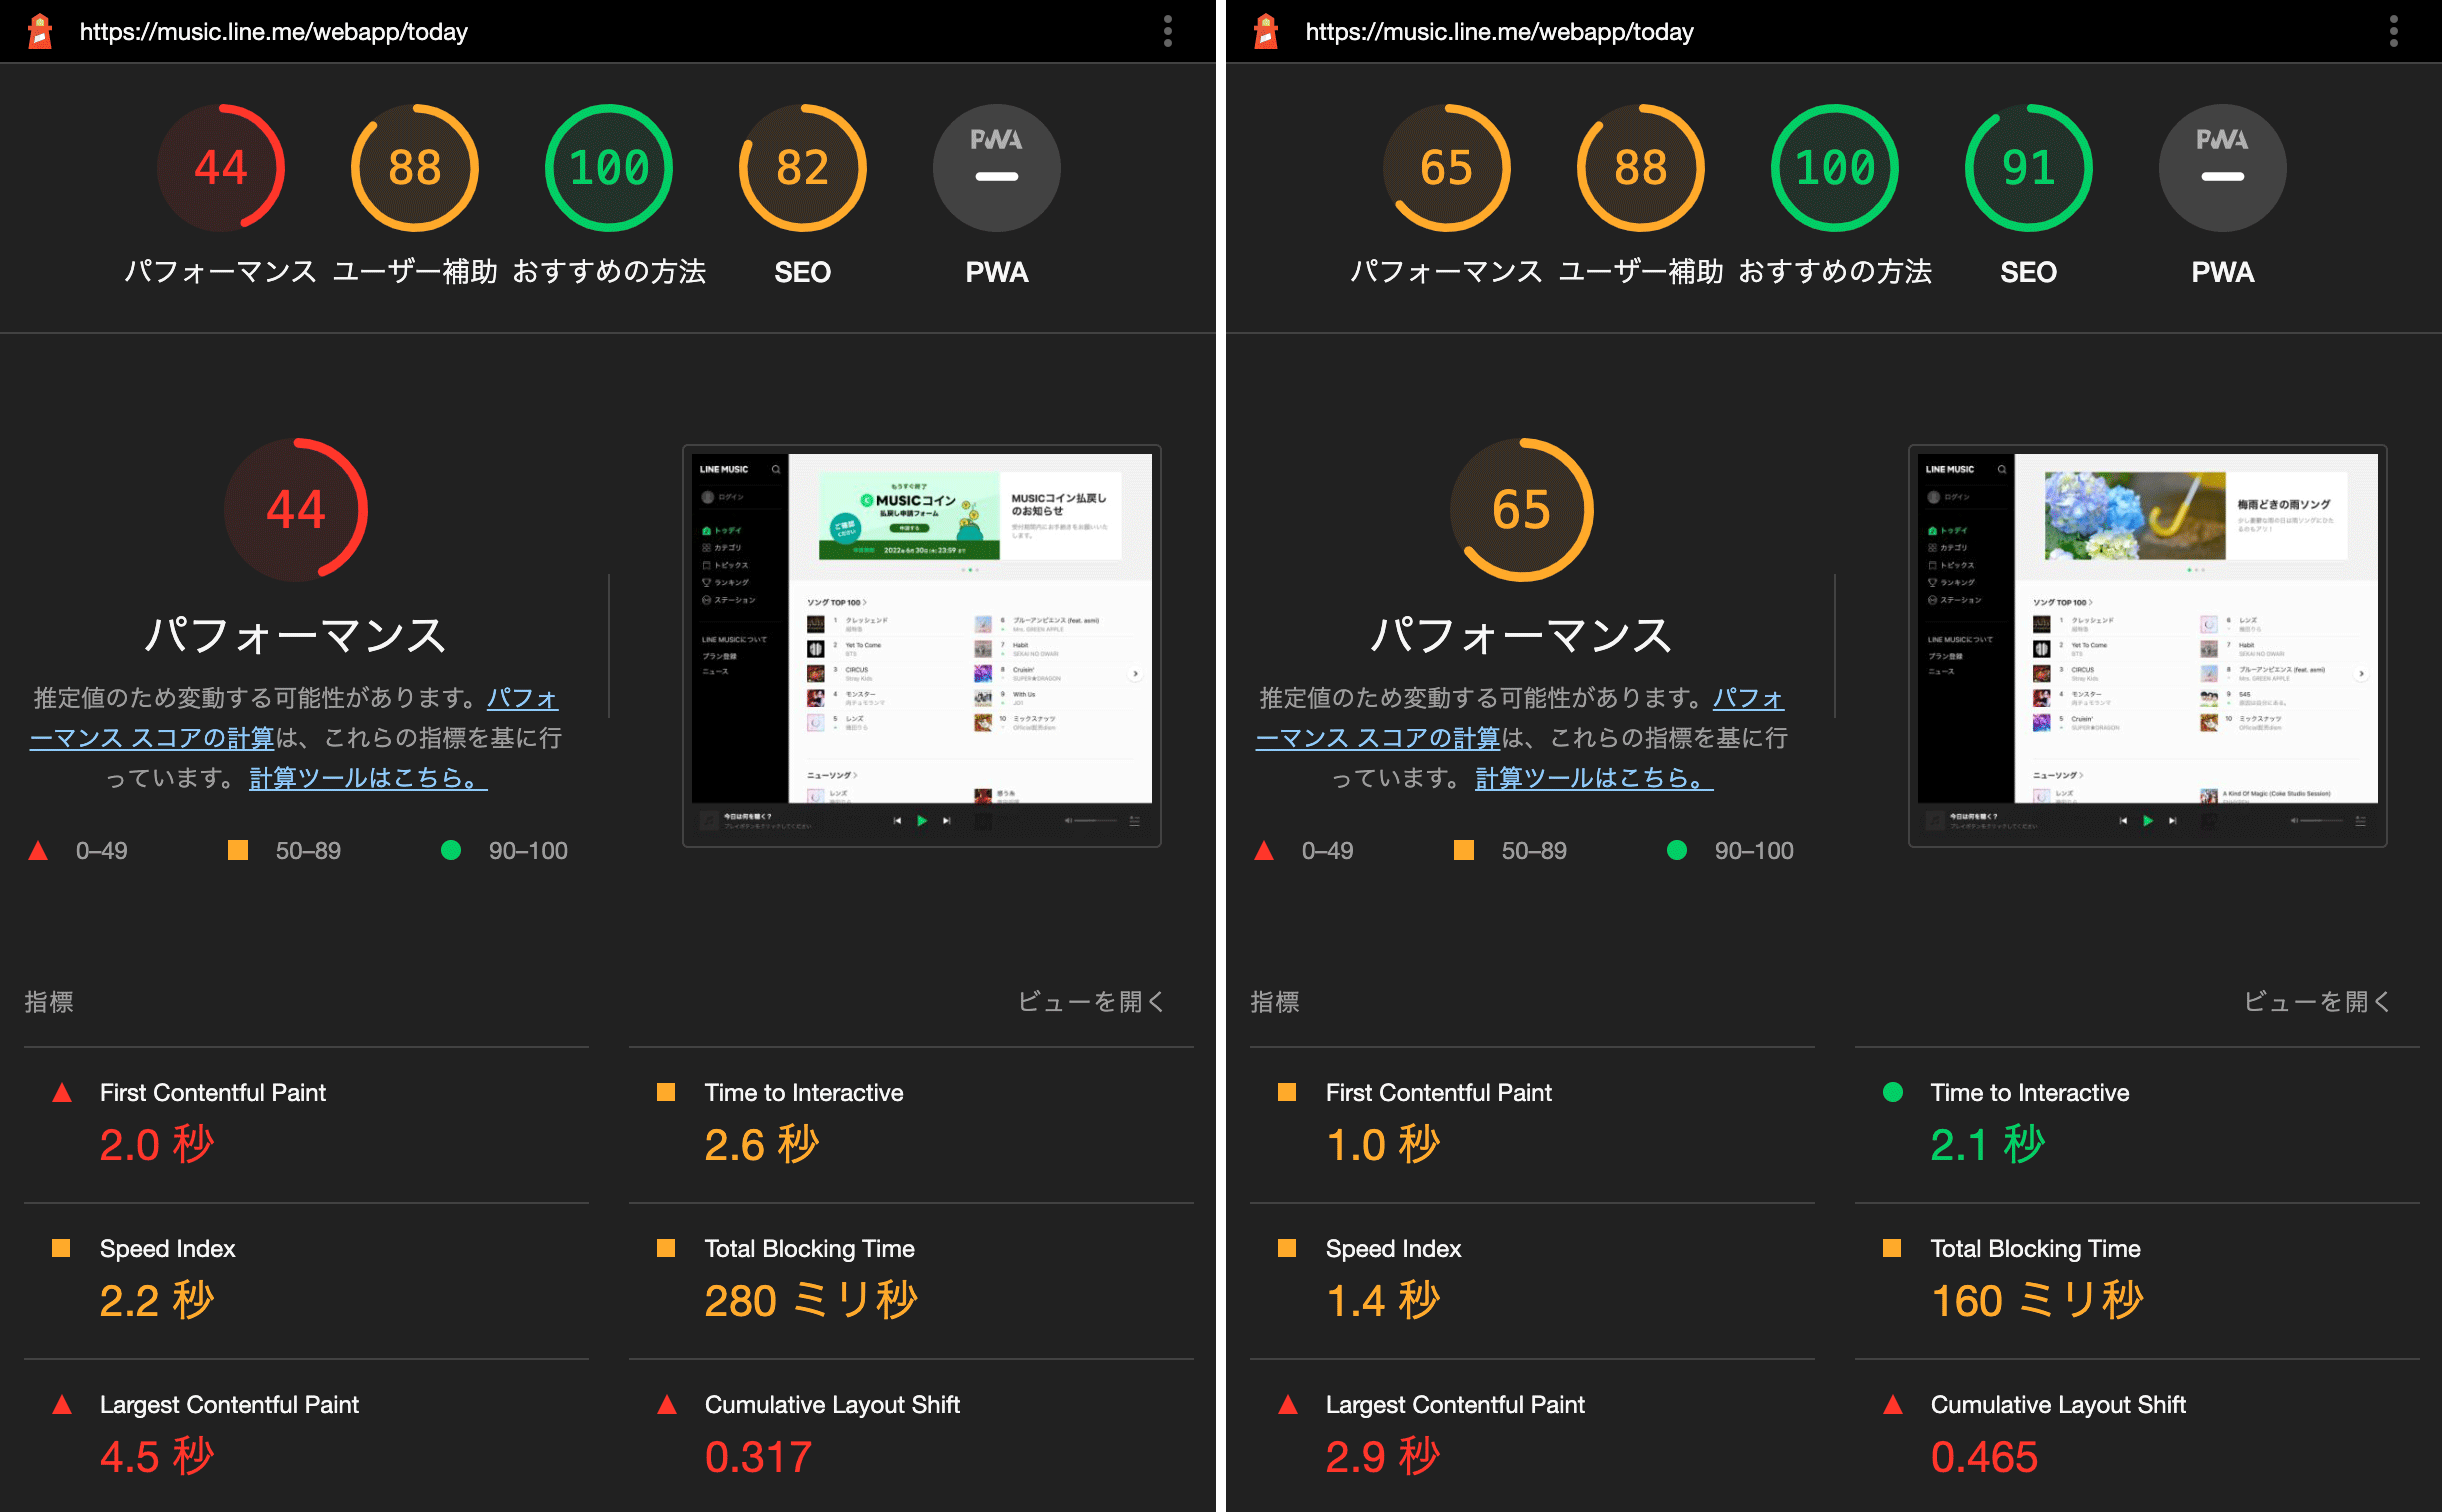
When releasing a version that uses Vue 3 and Vite, we compared it with the former one using Google Lighthouse. The results showed a significant performance score improvement from 44 to 65.
While it isn't a pure comparison between Vue 2 and Vue 3, I believe that adopting Vue 3 had a significant impact.
The chart below shows the time required for displaying the top page, which was measured using Sentry. It clearly shows loading times were reduced by half after the release. Now, 75% of users can display the page within two seconds.

Conclusion
We adopted Vue 3 to improve application performance and to also facilitate our adoption of Composition API and TypeScript in the future. We will continue to make development efforts toward making the LINE MUSIC web app even better while committing ourselves to more refactoring and improvements.
The LINE Kyoto development office is recruiting front-end engineers to work with us. If you want to work in Kyoto or are interested in front-end development and product improvement as a team, we are looking forward to working together with you for future development.