
Hello, my name is @sunderls, and I am involved in LINE MANGA as a JavaScript developer.
Have you all noticed that you can now read manga on LINE?1) If this is a news to you, tap the more button (...) and then the LINE MANGA menu to take a ride through countless awesome manga available on LINE.

To let you in on a little secret, the screen you are seeing below is implemented with web-based technology. We think the smoothness of the screen transition is close to that of a native app. What do you think?
On this post, I'd like to share with you the technology we used to achieve such performance.
Issues in Web-based implementation
React or Vue is often used for implementing web apps or webpages. To implement transition, the first thing that will come to your mind is adding transitions to the Router. Using the react-router or vue-router for transitions is perfectly fine. However, achieving smooth transition is somewhat different story. You will find yourself facing a number of issues like the following:
- Delay when tapping the back button
The reason for the delay lies in the router replacing the DOM. In the case of LINE MANGA, since the top page is long and complex, more delay is experienced when tapping the back (<) button . Ensuring comfortable user experience throughout all the services provided on LINE is crucial. The response to tapping the back button must be swift.
- Going backwards does not take you to the last scroll position
This is a problem commonly experienced on SPA (Single Page Application). Saving and restoring the last position is possible using JavaScript, but is not an easy task for sure. LINE MANGA engages users not only to scroll vertically, but to swipe as well as moving sideways by tapping an arrow icon. Supporting all possible use cases is practically difficult.
- Images with lazy load flicker
We often see patterns on a screen for placeholders. Even when the back button is tapped, lazy loading is triggered so the screen flashes.
These issues can be summed up to this question. How can we restore the DOM to its original state in returning back to the previous page, when the DOM has been changed by user actions such as scrolling or tapping?
What if developed as a native app?
To make the LINE MANGA pages perform like a native app, it was important for us to take a look into native implementation. Let us look at Apple's UINavigationController.
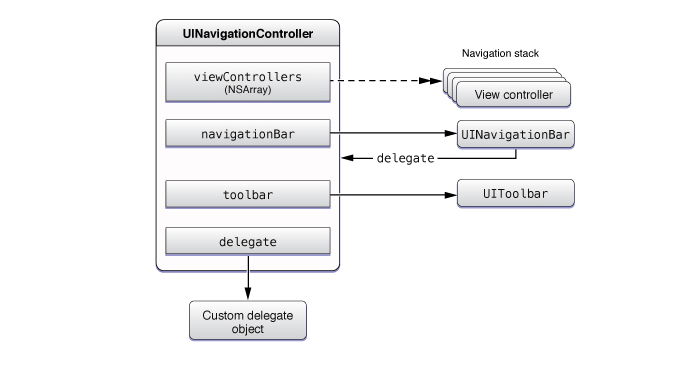
With UINavigationController, view controllers are managed in a navigation stack and the views get pushed or popped, using the following functions.
func pushViewController(_ viewController: UIViewController, animated: Bool)
func popViewController(animated: Bool) -> UIViewController?
We came to think that if we use the same stack to manage all the pages, no DOM replacement will take place for page transitions. The issues would be resolved. So, with LINE MANGA, we have implemented a similar stack like the navigation stack, named as the page stack.
Implementing a page stack
To implement a page stack, we need to implement the following three components:
- Container component,
<Stack>- A container to hold all pages in one place - Page wrapper,
<Page>- A page wrapper to wrap the pages of the project. - Functional component,
<withStack()>- Glue the components of each page with the common components for the page stack
Let's see how the following three components are implemented with HTML and JavaScript using React and react-router.
HTML Structure
We structured our HTML as the following for LINE MANGA. Each page is represented as <page> tags, and the pages are contained in a page stack, <PageStack>. (Just for your information, Modal is also implemented as a stack.)
<div id="root">
    <PageStack>

        <page>
            <content />
            <mask />
        </page>

        <page>
            <content />
            <mask />
        </page>

        ...
  </PageStack>

  <ModalStack />
</div>
Creating a container component, <Stack>
The following code creates a container for page components, and provides methods to handle user's action on LINE MANGA. Since the code is provided just for explanatory purpose, some of the code (CSS-related) is omitted.
class Stack extends React.PureComponent {
    constructor(props) {
        super(props);

        this.state = {
            stack: []   // This is where each page element is contained
        };

        // Push the first page
        this.state.stack.push(this.getPage(props.location));
    }

    componentStack = [];  // Store the components of each page

    // Wrap a page defined in the react-router with the <Page> component
    getPage(location) {
        return <Page
            onEnter={this.onEnter}
            onEntering={this.onEntering}
            onEntered={this.onEntered}
            onExit={this.onExit}
            onExiting={this.onExiting}
            onExited={this.onExited}
            >
            {
                React.createElement(this.props.appRoute, { location })
            }
        </Page>
    }

    // Update the stack according to the changes in window.location
    componentWillReceiveProps(nextProps) {
        // When the back button is tapped, pop the top page from the stack
        if (nextProps.history.action === 'POP') {
            this.state.stack.pop();
        } else {
            if (nextProps.history.action === 'REPLACE') {
                this.state.stack.pop();
            }
            // When pushing a page, wrap the page and push it as a new page
            this.state.stack.push(this.getPage(nextProps.location));
        }
    }

    // If swiping is supported, take care of the touchstart event in the capture phase
    componentDidMount() {
        if (this.props.swipable) {
            this.slideContainer.addEventListener('touchstart', this.onTouchStart, true);
        }
    }

    // If the screen is swiped from the left side, swipe the page backwards
    onTouchStart = (e) => {
        if (this.touchStartX < 10 && this.state.stack.length > 1) {
            e.preventDefault();
            e.stopPropagation();
            this.slideContainer.addEventListener('touchmove', this.onTouchMove, true);
            this.slideContainer.addEventListener('touchend', this.onTouchEnd, true);
        }
    }

    // Refresh the page’s translateX and mask opacity based on the finger movement
    onTouchMove = (e) => { ... }

    // When a finger leaves the screen, determine whether to return to the previous page
    onTouchEnd = (e) => { ... }

    // Refresh the mask opacity for the following hooks
    onEnter = () => {...}
    onEntering = () => {...}
    onExit = () => {...}
    onExiting = () => {...}

    // When a new page is pushed, trigger the componentDidHide hook on the previous page
    onEntered = (component) => {
        this.componentStack.push(component);
        const prevTopComponent = this.componentStack[this.componentStack.length - 2];
        if (prevTopComponent && prevTopComponent.componentDidHide) {
            prevTopComponent.componentDidHide();
        }
    }

    // When a page is popped, trigger the componentDidTop hook on the previous page.
    onExited = (component) => {
        this.componentStack.splice(this.componentStack.indexOf(component), 1);
        const topComponent = this.componentStack[this.componentStack.length - 1];
        if (topComponent && topComponent.componentDidTop) {
            topComponent.componentDidTop();
        }
    }
    render() {
        return <TransitionGroup>
            { this.state.stack }
        </TransitionGroup>;
    }
}

export default withRouter(Stack);
Creating a wrapper, <Page>
We create React components in each page. However, we want to avoid having to define transitions (e.g. direction, speed) for every single page. To handle transitions in a simple way, we wrap each page with the <Page> component. For example, suppose we have a sample page called <A_Sample_Page>. Then wrapping this page would make the code as <Page><A_Sample_Page></Page>.
Here is an example of creating the <Page> component.
// First, define the transition
const Slide = ({ children, ...props }) => <CSSTransition classNames={'slide'}
    {...props}>
    { children }
</CSSTransition>;

export default class Page extends React.Component {
    constructor(props) {
        super(props);
    }

    // Use the context to pass refPage
    getChildContext() {
        return {
            refPage: (c) => {
                this.page = c;
            }
        }
    }

    componentDidEnter = () => {
        if (this.props.onEntered) {
            this.props.onEntered(this);
        }
        if (this.page && this.page.componentDidEnter) {
            this.page.componentDidEnter();
        }
    }

    // Implement in the following hooks as implemented in the componentDidEnter() hook
    componentDidExit = () => {...}
    componentDidTop = () => {...}
    componentDidHide = () => {...}

    render() {
        const props = this.props;
        return <Slide
            {...props}
            onEntered={this.componentDidEnter}
            onExited={this.componentDidExit}
            >
                { props.children }
        </Slide>;
    }
}

Page.childContextTypes = {
    refPage: PropTypes.func
}
Create a functional component, withStack
We need a functional component to glue the components of each page with the common components for supporting the page stack. See the following code for how we implemented withStack as a gluing method.
class Wrapper extends React.Component {
    constructor(props) {
        super(props);
    }

    render() {
        return React.createElement(this.props.component, Object.assign({},
            this.props,
            {
                ref: this.context.refPage
            }
        ));
    }
}

Wrapper.contextTypes = {
    refPage: PropTypes.func
};

// With withStack, the refPage in the context is relayed.
export default function withStack(Component) {
    return (props) => {
        return <Wrapper component={Component} {...props}/>;
    };
}
This ends our explanation of the general implementation. Finally, let us look at usage.
Sample Code
See how we use the page stack implementation introduced previously.
// A.js
// This is a sample page
export default withStack(class A extends React.Component {
    constructor(props) {
        super(props);
    }

    // When the page is displayed and the transition ends
    componentDidEnter() {...}
    // When page is hidden, and the transition ends
    componentDidExit() {...}
    // When the page becomes the top page again
    componentDidTop() {...}
    // The page is no longer the top page
    componentDidHide() {...}

    render() {
        return <div> page A </div>;
    }
});

// appRoute.js
export default function AppRoute(props) {
    return <Switch location={props.location} >
            <Route path="/a" component={A}/>
            <Route path="/b" component={B} />
            <Route path="/" component={Top} />
    </Switch>
}

// app.js
class App extends React.Component {
    constructor(props) {
        super(props);
    }

    render() {
        return <Router>
            <PageStack
                swipable={true}
                appRoute={AppRoute}
            />
        </Router>
    }
}

ReactDom.render(<App/>, document.querySelector('#app'));
Implementation Result
The following animation shows the result of using a page stack for our manga pages. As you can see, page transitions are very smooth. So is swiping back.

Slow transitions work fine as well.

Conclusion
On top of improving the transitions, we are seeking various ways improve our service. The page stack has become a firm foundation for our efforts. We wonder what you think about work. If you like what we've done, then what are you waiting for? Open up LINE MANGA on your phone right away!
And one more thing. The engineers at LINE are always working hard to provide the best service for our users. To do so, we are actively looking for front-end engineers. Please apply if you are interested.