Introduction
LINE supports its developers so that they can fully focus on development. This was the background of implementing Nucleo, LINE's in-house Kubernetes-based service, taking care of infrastructure on behalf of developers. Nucleo currently services 800 apps with about 4,000 pods. The number of apps is growing by the minute. All the workloads are being managed with PMs (physical machines) and VMs (virtual machines), approximately 60 for the development region and 80 for the operation region respectively. In addition, there are 30 to 40 clusters for Nucleo development and 20 to 30 mini clusters, composed of three nodes, for feature testing. It requires a means to quickly and effectively install and operate Kubernetes clusters, especially when we have so many Kubernetes clusters to manage. So, Nucleo Team developed Caravan for the purpose of Kubernetes cluster provisioning. Recently we created and tested a large quantity of Kubernetes clusters to see if Caravan can handle the growing number of apps. I'd like to share the details of the test and what we've learned from the test.
What is Caravan?
Caravan is a Kubernetes cluster provisioning service built on know-how that we accumulated and standardized from developing and servicing Nucleo. Whenever a new commit is created, Nucleo conducts an integrated test in Kubernetes clusters. Each integrated test entails modifications such as creating a new API or deleting the existing deployment in Kubernetes clusters. As a result, Kubernetes clusters will be left with different statuses before and after the test. Caravan resolved this so-called snowflake problem by conducting an integrated test on new commits with another cluster and deleting clusters that have different statuses after the test.
Caravan: Phase 1
The initial purpose of Caravan was to maintain a pool of Kubernetes clusters for various tests. Clusters in the pool were assigned at the start of a test and automatically deleted within a certain time frame after the test. Rancher was used for Kubernetes cluster provisioning. Node templates for IaaS (Infrastructure as a service) were created, and these node templates were used to create clusters. We used cron to schedule jobs to run every 10 minutes in order to maintain the number of idle cluster pools.
We identified a few issues with Rancher, and the biggest issue came from using RKE. Rancher creates clusters with Docker Machine based RKE, and RKE can be extended with a Docker Machine driver. However, RKE's limited compatibility (i.e., being compatible with Docker only) emerged as a problem when the team decided to adopt Containerd as a container runtime for the future Kubernetes architecture.
By design, Rancher requires a cattle-cluster-agent per cluster and a cattle-node-agent on each node of the cluster. These two agents report the status of the cluster via secure WebSocket (WebSocket over TLS) to the core of Rancher (This structure is similar to communications between kubelet and kube-apiserver). When a large cluster with many subclusters or nodes is created in Rancher, communications from numerous agents could result in excessive overload of the Rancher server. Then, Rancher often mistakes such overload as a problem with a normally functioning cluster and returns an error to the Kubernetes API request.
Rancher surely is a convenient tool to produce Kubernetes-based clusters and supports various additional functions such as AuthNZ, Catalog and CI. However, such convenient APIs and functions were not a big merit to the team as we were more after stability and scalability. It seemed like the stability of the core fell victim to various functions, putting a drag on development. This is why we decided to develop a stable and scalable cluster management tool of our own.
Caravan: Phase 2
The main goal of Caravan phase 2 was to achieve scalable and stable cluster provisioning. The solution we came up with was to combine Kubeadm, Ansible and CRD. Kubernetes cluster API was the best fit as a framework for the solution. At the time of developing phase 2 however, the development of OpenStack standard implementation was still underway so we had to develop it on our own.
Kubeadm is an official installation tool for Kubernetes with great scalability and ongoing development. We chose Ansible over Terraform. Indeed, Ansible is imperative in nature and more vulnerable to the "snowflake problem," compared to Terraform, which is a declarative model. Yet, we could reuse the existing Ansible Playbook and our engineers were more experienced with Ansible. Moreover, Terraform had an integration problem with the in-house IaaS.
The workflow of phase 2 is as follows:
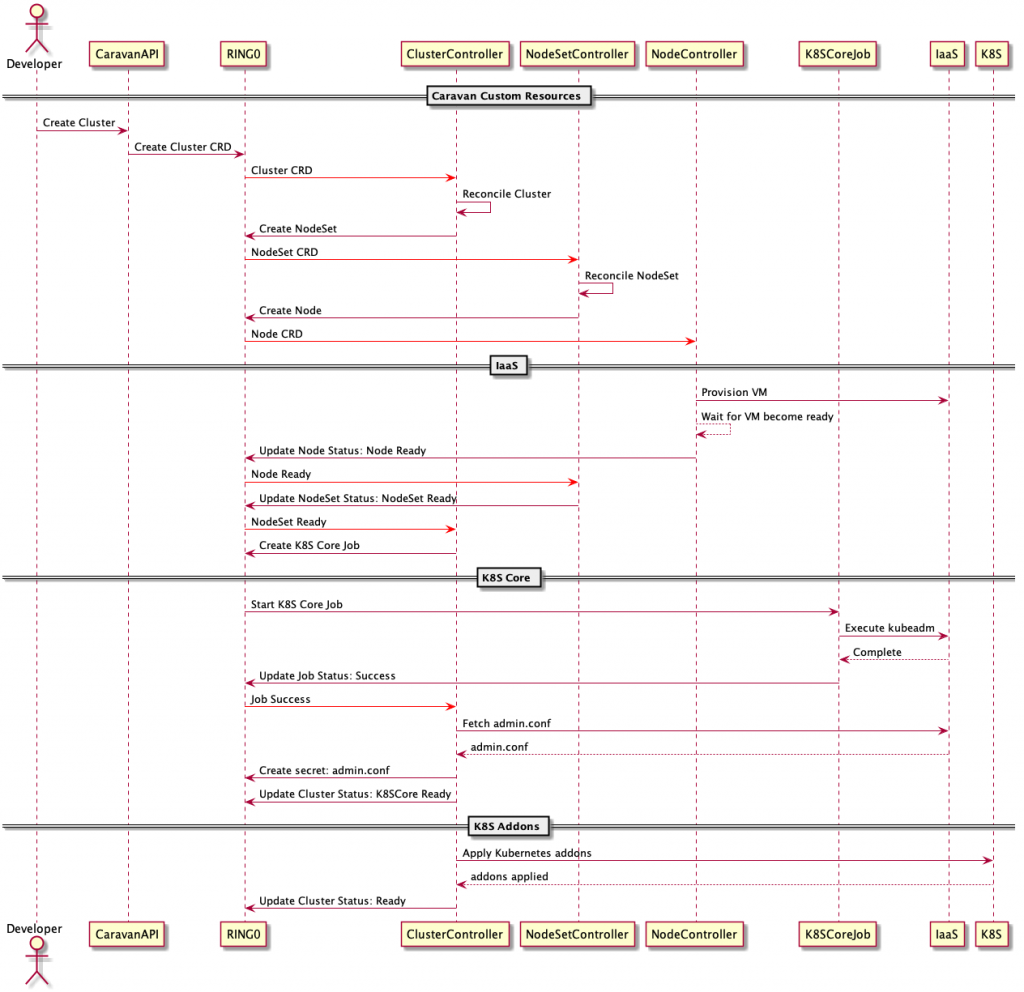
When a user creates or modifies a cluster CRD with API or UI, the corresponding custom controllers (i.e., ClusterController or NodeSetController) reflect those requests to actual clusters. We directly monitor Kubernetes API of subclusters or nodes for the purpose of health check instead of relying on agents.
Caravan custom controllers adopted the Deployment, ReplicaSet and Pod structure of Kubernetes and orchestrate three resources, namely cluster, NodeSet and node. The workflow above does not show it, but ClusterController creates the DNS (Domain Name System) and controls kubeconfig for subclusters (reference) as well.
Caravan UI
The following screen shows the cluster list in Caravan. You can check out overall information of the clusters including their state and access history.

Next is the menu for creating a cluster. You can choose a Kubernetes driver, and each node is configured in line with internal IaaS of LINE.

Finally, this is the individual cluster page, providing details on the cluster and nodes.

Deployment version for testing
Kubernetes was set up to run on a total of 1,019 nodes, composed of 20 master nodes and 999 worker nodes. Master nodes were set up in a VM with 8 core CPUs and 32GB of memory while worker nodes were installed in a VM with 1 core CPUs and 2 GB of memory. Each node would run about 50 pods. We chose VMs with low specifications for testing purposes.
Test method
We created 50,000 nginx pods and monitored how they performed on the clusters with the abovementioned specifications.

Issues and improvement
We identified issues with etcd performance, scheduling, and cilium etcd. I'll elaborate on each issue and the corresponding improvements below.
etcd performance
Note. etcd is a distributed key-value store.
Caravan uses the following stacked etcd topology by default.

When Kubernetes is configured with the stacked etcd topology, etcd used by both Kubernetes control plane (kube-apiserver, kube-controller-manager, kube-scheduler) and Kubernetes is deployed to the same master node and only accepts requests from kube-apiserver located in the same node. It is easy to install and manage, especially for replication of control plane nodes. With large scale clusters, however, there is a risk of system failure due to a shortage in resources as the control planes and etcd members share the resources of the same node. In addition, under the stacked etcd topology, etcd uses the static pod of the master node, consequently executing the same number of etcd instances as that of master nodes. It becomes difficult to make the number of instances different for control plane and etcd.
To resolve this issue, we included the external etcd topology in Caravan to allow the distributed data storage cluster provided by etcd to be installed and operated externally, if required.
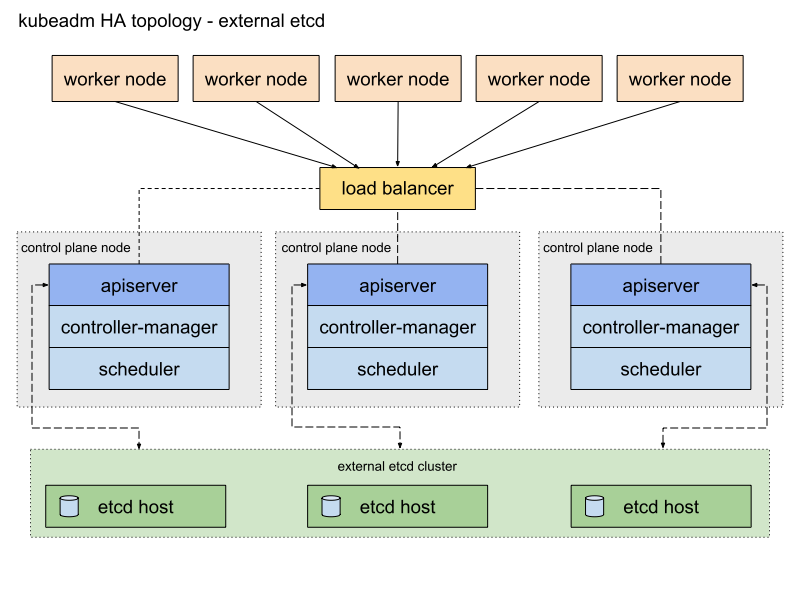
To use the external etcd topology, you need to designate the endpoints of external etcd in etcd.external.endpoints under the cluster setting of kubeadm. Cilium, Caravan's default CNI, also requires dedicated etcd so we made a modification to install cilium-etcd in the etcd node when using the external etcd topology.
Scheduling
When deploying workloads to large scale clusters, it took too long to assess the state of all nodes and identify optimal nodes. We resolved this scheduling issue with a sampling of some of the nodes instead of all nodes, using the percentageOfNodesToScore of KubeSchedulerConfiguration (Reference).
- Scheduler specifications
apiVersion: kubescheduler.config.k8s.io/v1alpha1kind: KubeSchedulerConfiguration...percentageOfNodesToScore: 10 |
cilium etcd
When you modify an application with multiple replication nodes, it entails substantial network configuration changes, which often brings the cilium agent to stop. We have done some research to identify what caused the cilium agent to stop. It appeared that the cilium agent directly monitored Kubernetes core etcd. For optimized event handling, we used the enable-k8s-event-handover option so that the operator directly monitored Kubernetes events. As all Kubernetes services are mirrored into the cilium kvstore by the cilium operator, the cilium agent needs to monitor the cilium kvstore only, easing the load on the Kubernetes core etcd.
Wrap-up
We are now better equipped with operational know-how on Kubernetes with the recent installation and test of large Kubernetes clusters. This experience and knowledge will be a valuable asset in developing and running the Nucleo service. Thank you for taking the time to read my post.